Datasets

Datasets are essentially files or directories that have been marked by space users as representing data collections relevant to them. They can be used to organize data in a space in a systematic way.

Datasets offer additional features, compared to regular files and directories:

  • optional data and metadata protection,
  • dataset structure tracking using the dataset browser,
  • ability to create persistent snapshots of the physical dataset contents — archives.

Datasets can be nested, allowing users to compose arbitrary hierarchical structures.

Datasets in a space

centered no-margin

Open Archival Information System (OAIS)

centered

Submission Information Package (SIP)

The SIP is an Information Package that is delivered to the system for ingest. It contains the data to be stored and all the necessary related metadata. The SIP is ingested into the system and serves as a basis for the creation of an Archival Information Package (AIP) and a Dissemination Information Package (DIP).


Push Pull
Web GUI — upload the data Oneprovider — data import
REST API Automation engine:
CDMI      - Bagit (fetch)
S3 (rclone, aws-cli, s3cmd, MinIO...)      - Fetch.txt
Oneclient / OnedataFS      - other custom scripts

Archives

A snapshot of a dataset created at a certain point in time is called an archive.

Archives are immutable and stored within a space, lying in a special directory detached from the regular file tree. They can be accessed using the specialized browser of datasets and archives.

The archive creation process comes with several options:

  • different layouts — the structure of the files in the created archive; support for BagIt,
  • creation of nested archives — hierarchically-created archives for datasets with nested structure,
  • incremental archives — reusing the unchanged files between snapshots,
  • including DIP — a Dissemination Information Package,
  • possibility to follow symbolic links if they are present in the dataset.

Exercise

Establishing a dataset and creating archives

  1. Navigate to the directory created for your username.
  2. Open the context menu for the FirstDataset directory and choose Datasets. screenshot
  1. Click on the Establish dataset in the datasets right-side panel.

  2. The panel should now present a summary of the dataset established on the FirstDataset directory.

    screenshot

  1. Navigate to the Archives tab in the datasets panel.
  2. Click on the Create a new archive button.
  3. In the Create archive modal, write a description of the archive and use the default archivisation settings.
  4. Click on the Create button.
    screenshot
  1. Upon successful creation, the archive list should include the newly created archive.

    Various actions for the archive are available in the context menu. Try:

    • viewing the audit log,
    • downloading the archive and viewing the contents.

    screenshot

  1. Double-click on the archive row to browse through its contents.

    Note that the custom metadata set on the original files in previous exercises have also been snapshotted with the file data — use the badge to view it.

    When you finish browsing, use the breadcrumbs to navigate back to the archive list.

    screenshot no-margin

  1. Use the Create archive button to create another archive with a Second archive description and default settings.

    Now, you should see two archives on the list.

    screenshot

Incremental archives

A regular archive is a full copy of the dataset contents, occupying an additional storage quota. Storage space can be saved by creating incremental archives, whenever possible.

An incremental archive is created upon the chosen base archive and reuses all files that haven't been modified between the snapshots, creating hard links to them (which take no storage space). Only the modified and new files are copied.

Incremental archives in a space

centered no-margin

Exercise: creating an incremental archive

  1. Navigate to the directory with the dataset established by the colleague on your left.

  2. Upload all files from the Supplement II directory from the demonstration dataset (on your local disk since the previous sessions) into the Photos directory.

    screenshot no-margin

  3. Navigate back to the dataset established by the colleague on your left and open the datasets panel for the FirstDataset.

  1. Switch to the Archives tab in the datasets panel. The two previously created archives should be there.

  2. Right-click on the second archive on the list and choose the Create incremental archive action from the context menu.

  3. The Incremental toggle should be enabled and locked. The Base archive should indicate the chosen one.

    screenshot no-margin

  4. Click on the Create button.

  1. In a few moments, the new archive should pop up on the list.
    Note the Base archive indication.

    screenshot

    Also, note that the Owner of the archive differs from that of the archive created previously by your colleague.

  1. Double-click on the archive row to browse its contents and navigate to the directory with files.

    Original, unmodified files from the first archive have 2 hard links badges, indicating that the incremental archive reuses the data stored in the base one.

    The new files do not have the badge, since they have been fully copied.

    screenshot no-margin

  1. Go back to your dataset and find out if the colleague on your right has properly done the exercise. You are allowed to be extremely critical — it's your Dataset we are talking about.

Only the users with sufficient privileges (typically, non-regular space members) are allowed to manage datasets and create archives — details will follow later.

Archive recall

While archives serve as immutable snapshots, the dataset may evolve in time as the data in the space changes. Sometimes it is desirable to bring back a certain snapshot into the space filesystem to work on it.

To do that, users may recall the archive. The process copies the data at the chosen path in the space, creating a new file/directory that is not logically linked to the original dataset.

Exercise: recalling an archive

  1. Navigate to the dataset management panel of the previously established dataset.

  2. Right-click on the latest archive and choose the Recall to... action.

  3. In the Recall archive panel that has appeared, navigate to the directory with your name.

  1. Set the Target directory name at the bottom to RecalledDataset1.

    Below that, the resulting path to the root of the recalled data should show:

    <Space name>/<Username>/RecalledDataset1
    

    screenshot no-margin

  1. Click on the Recall button.

  2. Close the Datasets panel and navigate to the directory created for your username in the file browser. During the recall process, its progress is presented in the RecalledDataset1 row. After completion, the Recalled badge will appear.

    screenshot no-margin

  3. Click on the Recalled badge.

  1. In the Archive recall information panel, you can see various information about the completed recall process, such as source archive and dataset, start and finish times, and amount of recalled data.

    There is also an Error log tab that contains information about files that have failed to be recalled. In this scenario, the log should be empty.

    screenshot no-margin

  1. Close the panel and open the recalled directory in the file browser. Examine its contents.

    The directory can be used just as any other in the space and the only difference is the context information that this is a recalled archive, indicated by the badge.

    screenshot

Dataset hierarchy and nested archives

Datasets can be established on files or directories lying inside other datasets. This way, a hierarchy of datasets can be built and then embraced to create nested archives.

Exercise: modifying and browsing dataset hierarchy

  1. Navigate to the directory with the dataset established in previous exercises in the file browser.

  2. Find inside the directory called Nested1. Right-click on it and choose Datasets from the context menu.

  1. In the datasets panel, you should see an indication that there is no established dataset on this directory. Below that, the list of Ancestor datasets should include the previously created dataset (click to expand).

  2. Click on the Establish dataset button on the right side of the panel.

    screenshot no-margin

  1. Upon successful dataset establishment, you should see that the selected directory, Nested1, is listed as the last item on the Dataset hierarchy list.

  2. Currently, your dataset hierarchy has two levels. We need to go deeper.

    screenshot

    Close the panel and enter the Nested1 / Nested2 / Nested3 directory in the file browser.

  1. Open the datasets panel for the Nested4 directory and establish a dataset.

    Now you should see the following hierarchy:

    • FirstDataset,
    • Nested1,
    • Nested4.

    Non-dataset directories on the path are not listed.

  1. Click on the Show in dataset browser button in the bottom-left corner of the datasets panel.

    The space dataset tree browser should open with the Nested4 dataset selected.

    The bottom half of the view presents the list of archives for the selected dataset (which is currently empty).

    screenshot no-margin

  1. Using the breadcrumbs at the top navigate to the first item on the path, which is the space root directory.

    Now, you are viewing the root of the space's dataset hierarchy. You can also bring up this view from the left sidebar menu: Space > Space name > Datasets, Archives.

A note on the detached datasets

Datasets that are no longer needed (from the space data PoV) can be detached. A detached dataset is decoupled from its root file/directory and serves only archival purposes. All the archives created from the dataset are retained. The dataset does not correspond to any physical content in the space file tree, but it shows up in the dataset browser.

If the original file/directory is not deleted, the dataset can be later re-attached.

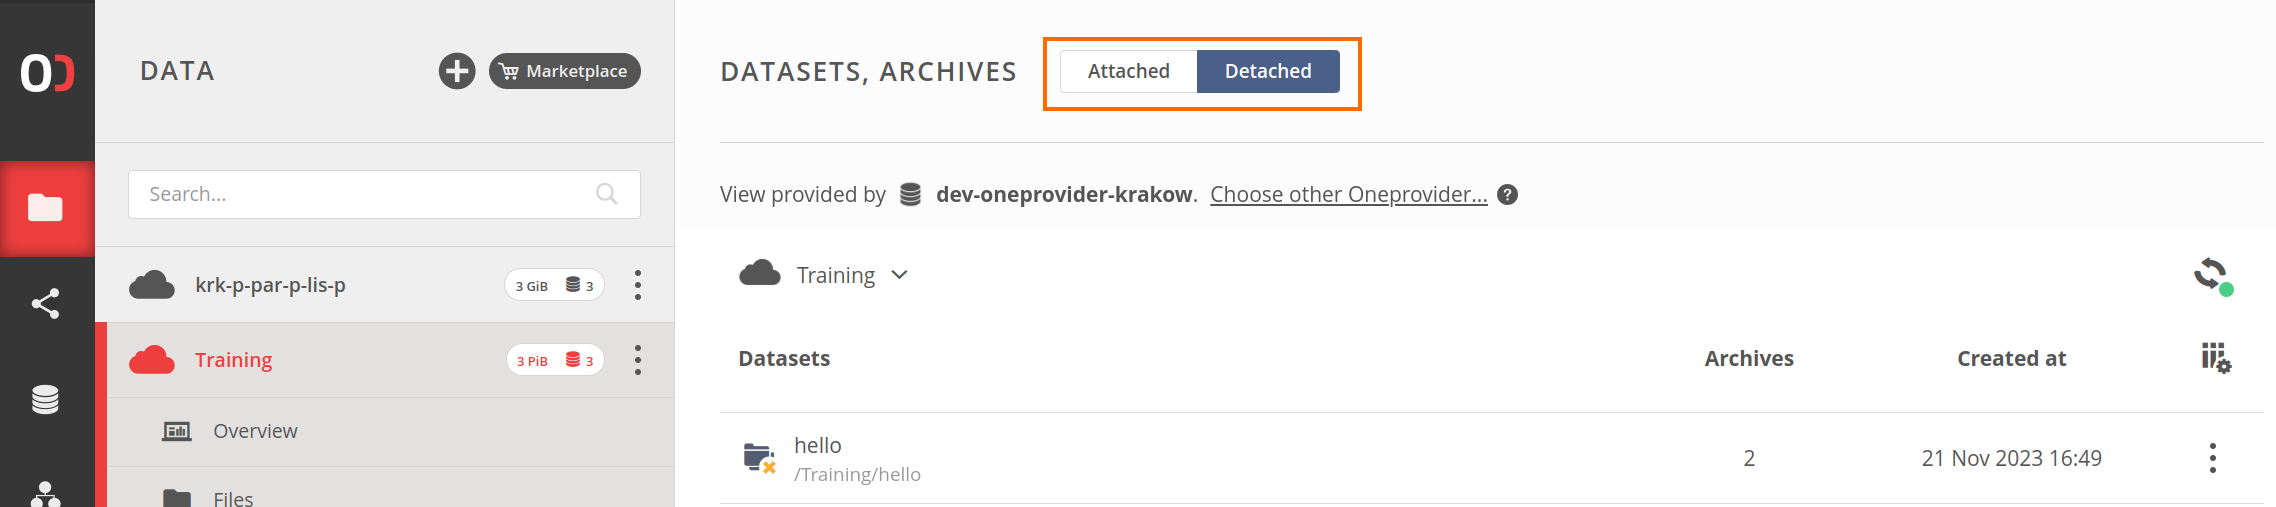
In the current version of Onedata, detached datasets can be viewed using the switch at the top of the Datasets, Archives view.

screenshot no-margin

Nested archives

Nesting datasets allow composing structures of desired granularity. An embedded dataset can be a logical whole that's useful individually, and at the same time be a part of a bigger data collection, vital for its completeness.

Those nested structures are also important when archives are created; on the ancestor dataset level, users may choose to create a monolithic archive or create nested archives in the process. This way, a set of linked archives will be created.

Nested archives in the dataset tree

centered no-margin

Exercise: creating nested archives

  1. Navigate to the Datasets, Archives view of the space.

  2. Right-click on the FirstDataset dataset on the list and choose Create archive from the context menu.

  3. Create an archive with default settings — do not use the Create nested archives option just yet.

  4. Browse files of the newly created archive.

    Note that Nested1 and Nested4 directories have been fully copied into the archive.

  5. Create the next archive for the FirstDataset dataset. This time enable the Create nested archives option.

  1. Browse files of the newly created archive.

    Note that Nested1 and Nested4 directories are symbolic links. These links point to directories copied into the nested archives that were created from those nested datasets.

    screenshot no-margin

  1. Double-click on the FirstDataset dataset at the top of the view to browse its children in the dataset tree.

  2. Select the Nested1 dataset in the browser.

    In the bottom view, the list of archives for the Nested1 dataset should contain one entry. This archive has been created in the process of creating the parent archive. It serves as a separate archive on its own but is linked from within its parent.

    screenshot

  1. Browse the archive files.

    The file tree starts from the Nested1 directory, to which the symbolic link in the FirstDataset dataset points.

    Go through the nested directories to see that there is also a symbolic link to the Nested4 directory.

    screenshot no-margin

Dataset protection

The lifecycle of a dataset can look like the following:

  • acquisition — creating and collecting,
  • consolidation and aggregation,
  • processing/analysis,
  • annotation,
  • publishing/sharing,
  • archiving.

Quite often, there is a need to apply certain procedures at different stages of data curation. For example, at the annotation stage, the dataset managers may wish to freeze its contents from further modifications. Similarly, at the publishing stage, the authors may wish to disable further changes to the annotated metadata — especially if the dataset has been assigned a persistent identifier and referenced in scientific works.

Dataset protection flags

To prevent changes in the dataset, users can set temporary protection flags, which cause the files and directories in the dataset to be protected from, accordingly:

  • Data protection — modifying their content or being deleted,
  • Metadata protection — modifying their metadata, such as custom JSON/RDF/xattr metadata, permissions, or ACLs.

The protection flags are inherited by children datasets — datasets lower in the hierarchy tree have protection at least as strong as their ancestors.

Exercise: setting protection on the datasets

  1. Navigate to the parent directory of the dataset from previous exercises in the web file browser and open the datasets panel using the Dataset badge.

    You should see two indicators in the upper-right corner of the panel say:

    • directory's data is write enabled,
    • directory's metadata is write enabled.

    This means that the dataset is not protected — users can modify the data and metadata of the files and directories inside.

  1. Click on the toggle in the Data write protection column of the Datasets hierarchy table to enable it.

    Note that the second toggle, Metadata write protection, requires that first the data protection is enabled. Do not enable it just yet.

    The two indicators in the upper-right corner of the panel should now show:

    • Directory's data is write protected,
    • Directory's metadata is write enabled,

    which means that the users cannot modify the data but still can change the metadata of the dataset contents, e.g. edit custom JSON metadata. Note that files cannot be renamed while the parent directory's data is write-protected.

  1. Close the datasets panel.

    The Dataset badge on the directory now has an additional icon that signs enabled dataset data protection.

  2. Enter the dataset directory in the web GUI file browser.

    Verify that creating directories or uploading files is now disallowed, like any other data modifying operation.

  3. Navigate to the Nested3 directory and open the datasets panel for the Nested4 item.

  1. Expand the Ancestor datasets section in the Dataset hierarchy table.

    The summarized ancestor dataset protection is presented in the first row, while the protection set for particular ancestor datasets is shown in each row separately. You can configure all the ancestor datasets protection in this table.

  2. Enable both Data write protection and Metadata write protection for the Nested1 dataset in the table.

    screenshot no-margin

  1. Close the panel and enter the Nested4 directory in the file browser.

    All operations modifying data or metadata of the files are now disallowed. Verify that — for example, try to add the Basic (key-value) metadata of a file inside the Nested4 / Nested5 path. The protection has been inherited from ancestor datasets.

BagIt archive

BagIt is a set of hierarchical file system conventions for organizing and transferring digital content.

A "bag" consists of the "payload" (actual content) with "tags" serving as metadata files documenting storage and transfer details. A mandatory tag file includes a manifest listing every file and its corresponding checksums.

The term "BagIt" is inspired by the "enclose and deposit" method, also known as "bag it and tag it".

Exercise: creating BagIt archive

  1. Open the DATASETS panel for the FirstDataset folder.
  2. Navigate to the Archives tab in the datasets panel.
  3. Click on the Create archive button.
  4. In the Create archive modal:
    • write a description,
    • set Layout to BagIt,
    • and enable the Include DIP toggle.
  1. Click on the Create button.
  1. Note the DIP and BagIt tags in the newly created archive row.

  2. Double-click on the archive row to browse through its contents.

    Note that the structure of this archive differs from that of the plain archive. In the BagIt archive, the data from the FirstDataset directory is located within the data directory. Additionally, there is a bagit.txt file and the manifest files containing checksums.

    Download the archive to examine the contents of the BagIt-specific files.

  3. Change the view option to DIP.

    screenshot

    Note that the size of FirstDataset is 0 B. If you enter the FirstDataset directory, you'll see that each file has 2 hard links — the data is reused among AIP and DIP versions of the archive.

Removing datasets and archives

While detaching a dataset is not a harmful operation from the archive's perspective, deleting the entire dataset is, so the dataset cannot be removed until it has any archives.

Archives can be deleted as long as their deletion will not cause loss of the data of another archive.

Exercise: trying to remove a dataset with archives

  1. Open DATASETS panel for the FirstDataset folder.

  2. Click on the Actions button in the top-right corner of the datasets panel.

  3. Hover over the disabled Remove action and note the message.

    screenshot no-margin

screenshot

Exercise: removing archives

  1. Navigate to the Archives tab in the datasets panel for the FirstDataset dataset.
  2. Click on the context menu for the archive with the Second archive description.
  3. Choose the Delete archive option.
  4. To delete the archive, you need to retype the text info displayed in the modal and click on the Delete archive button.
  5. After successful deletion, the archive will disappear from the list.

Exercise: trying to delete a child archive of a nested archive

  1. In the Onedata web file browser proceed to FirstDataset / Nested1 / Nested2 / Nested 3 in the directory created for your username.

  2. Open DATASETS panel for the Nested4 directory.

  3. Navigate to the Archives tab and using the archive row context menu, try deleting the archive by following the same steps as in the previous exercise.

  4. After retyping the text info and clicking on the Delete archive button, you should see the ERROR modal.

    screenshot no-margin

The child of the nested archive is referenced by the symbolic link in the parent archive. Deleting the child archive is not allowed, because it would cause an inconsistency of the parent archive.

Exercise: deleting the base archive of an incremental archive

  1. Navigate to the Archives tab in the FirstDataset datasets panel.
    In the previous exercise, My first archive archive was used as a base for incremental archive.

  2. Delete the My first archive archive following the same steps as in the previous exercises.

  3. Refresh the page and open the Archives tab of the FirstDataset datasets panel.

  4. Note the (deleted) label in the Base archive column of your incremental archive. screenshot

  5. Double-click on the incremental archive row to browse through its contents.

    Note that after deleting the base archive, there are no longer 2 hard links for each of the files. Logically, the data in the archive is still the same. Enter the FirstDataset / Photos path within this archive and try to download any file, or download the archive as tar and verify.

Space privileges regarding datasets and archives


Privilege Actions
Manage datasets establish, detach and remove datasets
View archives list and browse archives of datasets
Create archives create archives and manage own archives
Manage archives edit description of archives not belonging to the user
Remove archives remove archives
Recall archives recall archives into the space filesystem

Next chapter:

Shares, Public Data — practice