Data distribution, replica management (transfers), and QoS — practice

Topics

  • Data distribution
  • Replica management (data transfers)
  • Quality of Service (QoS)
  • Size statistics

Where the data is physically stored?

The data in spaces may be arbitrarily distributed among the storage backends of the supporting providers. It's not replicated by default, but you have powerful tools to control that.

centered

Data distribution and its benefits

Data distribution is about controlling the physical location of data fragments and is applicable for spaces with at least two provider supports.

Benefits:

  • Improved performance — when interacting with the data available locally on the provider where it is needed.
  • Better collaboration — users can collaborate and modify shared files on different sites, knowing that the changes will be synchronized.
  • Data loss prevention — data copies distributed across multiple physical locations provide redundancy.
  • Compliance with policies — ensuring the data is stored in particular geographical locations.

Data distribution in Onedata

  • files are made up of parts of variable sizes — file blocks,
  • each provider holds a set of local file blocks, constituting a file replica,
  • when a file is read on a provider and the requested blocks are not present there, the missing ones are replicated on the fly from remote providers,
  • when a file is written on a provider, the overwritten blocks on other providers are invalidated. To read the file, the provider with invalidated blocks must once again replicate missing blocks from the provider with the newest version of the blocks.


See the documentation here.

Exemplary data distribution of a file

centered screenshot

Note: The view of data distribution for directories differs slightly from the view for files; instead of the layout of blocks, the replication ratio is shown.

Practice preparation

  1. In the Onedata GUI go to the file browser of space alpha-11p.
  2. Make sure to switch to the provider that you have deployed.
  3. Create a directory with your name (without spaces) and open it.
  4. Download the demonstration dataset* (zip archive with images): https://drive.google.com/file/d/1WxfugfuItkvV6-VW19mDpH7ZUocFXMpD/view and unpack it on your computer.
  5. Select the FirstDataset directory within the unpacked directory files, and drag & drop it into the Onedata file browser view.
  6. Wait until the files are successfully uploaded.

* images taken from Pexels — free stock photos & videos you can use everywhere.

Exercise

Check the data distribution of your file

  1. Go to the file browser GUI of space alpha-11p and open the directory $yourName/FirstDataset/Photos.
  2. Right-click on one of the uploaded files and choose Data distribution.

    On which provider is your file physically stored? Is it distributed?

  3. Check the data distribution of the whole directory (use the dropdown menu next to the path breadcrumbs).

    Note the differences between the view for a file and a directory.

Exercise

Upload a file to impact the data distribution

  1. Switch to a different provider which has no replicas of the data in your directory. Use the switcher above the file browser.
  2. Upload the files from Supplement I directory of the unpacked dataset into your FirstDataset/Photos directory in the Onedata space.
  3. Check the data distribution of an uploaded file.
  4. Check the data distribution of the whole directory.

    You should see that the directory data is distributed between the two providers.

Controlling the distribution with transfers

Data transfer is a process of moving physical data between providers within a Onedata space. It is used to control the data distribution of a logical file/directory. See the documentation here.

Transfers can be initiated:

  • automatically (on the fly) — when a data read is requested, but the provider does not have the corresponding blocks. The missing data is replicated from other providers in the background, while the read operation is blocking.
  • manually — upon the explicit request of a user with sufficient privileges.

Types of manual data transfers

  • replication — copying (only the missing) data to achieve a complete replica at the destination. The data is copied from one or more providers holding the missing blocks.
  • eviction — removing replica(s) from the specified provider. This operation is safe and will succeed only if there exists at least one replica of every block on other supporting providers.
  • migration — replication followed by eviction. Replicates the data to the destination provider and then evicts the replica from the source provider.

Space privileges regarding transfer management


Privilege Actions
View transfers list and view transfer details
Schedule replication schedule replication transfer
Cancel replication cancel ongoing replication transfer
Schedule eviction schedule eviction transfer
Cancel eviction cancel ongoing eviction transfer


NOTE: scheduling migration (replication followed by eviction) requires both Schedule replication and Schedule eviction. Likewise, cancelling requires both Cancel replication and Cancel eviction

Exercise

Triggering an on-the-fly data transfer

One way to trigger an on-the-fly transfer is to read the file content via a provider with a non-full local replica.

  1. Open the data distribution view for one of the uploaded files in the space alpha-11p.

  2. Switch to a different provider which has an empty distribution bar. Use the switcher above the file browser.

  3. Double-click to download the file chosen in pt. 1.

  4. Open the data distribution view for the file. Note that the previously empty distribution bar has filled up.

  5. Go to the Transfers view of the space alpha-11p (use the sidebar) and look at the section ONEPROVIDERS THROUGHPUT. After a while, it should visualize the network traffic triggered by your on-the-fly transfer.

    Note: the statistics are delayed by 30 seconds.

    Note: the chart will show the summarized throughput caused by all transfers in the space, including those triggered by other users.

Scheduling a manual data transfer

Data transfers can be launched from the data distribution view — use the "three dots" menu. The status icons indicate if a transfer is currently in progress.

centered screenshot

Exercise

Scheduling replication

  1. Open the data distribution view for one of the uploaded files in the space alpha-11p.
  2. Click on the action menu for a provider that has an empty distribution bar.
  3. Click on Replicate here.
  4. Watch the distribution bar fill up.
  5. Use the flashing See ongoing transfers link to view more details about the transfer. Observe the transfer traffic happening in the space as multiple people do the practice.

Exercise

Scheduling migration

  1. Open the data distribution view for your directory.
  2. Click on the action menu for a provider that has a nonempty distribution bar.
  3. Click on Migrate... and select as destination a provider with no replicas.
  4. Watch the distribution bars become empty and full, respectively.

    Note that two transfer icons are flashing — replication for the destination provider and migration for the source provider.

  5. Use the flashing See ongoing transfers link to view more details about the transfer. Observe the transfer traffic happening in the space as multiple people do the practice.

Exercise

Scheduling eviction

  1. Open the information about the data distribution for one of the uploaded files.
  2. Click on the action menu for a provider that has a nonempty distribution bar.
  3. Click on Evict.
  4. Watch the distribution bar become empty.

    Note: if there are any unique blocks on the evicting provider, they will not be removed.

  5. Use the flashing See ongoing transfers link to view more details about the transfer. Observe the transfer traffic happening in the space as multiple people do the practice.

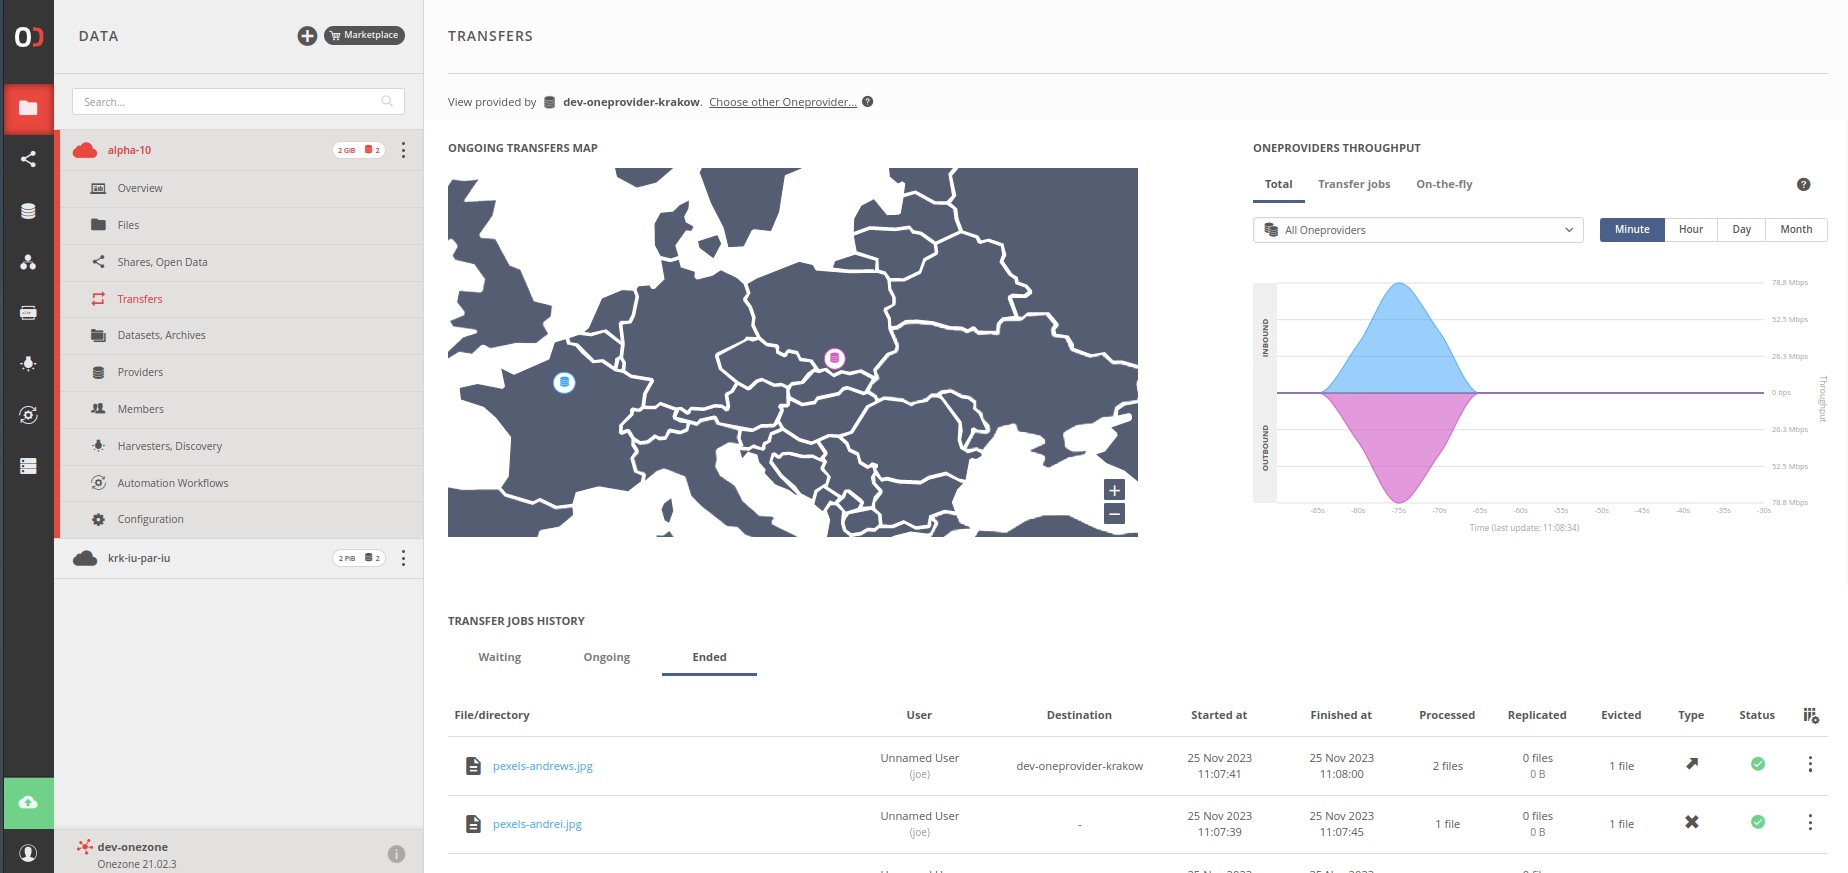
Data transfers history

Information about scheduled, ongoing, and historical data transfers is available in the dedicated transfers view. To navigate there, click on Transfers in the sidebar of the space alpha-11p.

Take some time to look around, examine the statistics, and see details of chosen transfers — click to expand.

screenshot centered

Question

Transfers are a handy tool for controlling data distribution, perfect for ad-hoc tasks, but they require manual effort and supervision.

What if the space is dynamically changing, but we would like to ensure some converging pattern of data distribution? Can this be automated?

QoS

Quality of Service (QoS) is used to manage file replica distribution and redundancy between providers supporting a space in an automated manner. See the documentation here.

  • QoS mechanisms are based on the continuous processing of QoS requirements,
  • each file or directory can have any number of requirements — in the case of directories, the requirement is applied to all its files and subdirectories, recursively,
  • if required, data transfers are automatically triggered to satisfy the QoS requirements — remote changes made to file content are automatically reconciled,
  • file replicas corresponding to QoS requirements are protected from eviction.

QoS requirement

A requirement is essentially a rule defining:

  • the desired data redundancy (replica count),
  • the placement of replicas (QoS expression).

Storage backends matching the QoS expression are selected for data replication in a continuous re-evaluation process until the target replica count is satisfied. If there are more matching backends than the target replica count, a random subset is selected.

QoS expression

  • a declarative way of specifying desired storage parameters in a unified format,
  • used to determine the replica placement — the target storage backends where the replicas of the data will be stored,
  • refers to storage backend parameters that are assigned by Oneprovider admins.

How to build a QoS expression?

  • an expression is a set of one or more operands, each referring to one storage backend's parameter,
  • an operand is in form key {comparator} value, where {comparator} is one of <, >, <=, >=, =, e.g. key = value. One exception from this is the single-worded, built-in operand anyStorage,
  • if any comparator other than = is used, only numeric values are allowed.
  • operands are processed left-to-right and can be combined:
    • & — expression matches if both operands match,
    • | — expression matches if any of the two operands matches,
    • \ — expression matches if the left-hand side operand matches and the right-hand side operand does not.

Examples QoS expressions

  • geo=PL — storage backends in Poland,
  • timeout < 8 — storage backends with timeout parameter set to less than 8,
  • timeout = 8 — storage backends with timeout parameter set to exactly 8,
  • geo=PL & type=disk — storage backends of disk type in Poland,
  • geo=PL | type=disk — storage backends in Poland or storage backends of disk type anywhere,
  • anyStorage \ type=disk — storage backends that are not of the disk type.

Parentheses in QoS expressions

Use parentheses to group operands that should be evaluated together, e.g.:

  • geo=FR | (geo=PL & type=disk) — storage backends in France or storage backends of disk type in Poland,
  • (geo=PL \ type=disk) | (geo=FR & type=disk) — storage backends in Poland that are not of disk type or storage backends in France that are of disk type.

QoS requirement status

  • fulfilled — the target replica count has been created on the matching storage backends and their contents are up-to-date (remote changes have been reconciled),
  • pending — the requirement is not yet fulfilled — data replication is still ongoing,
  • impossible — there are not enough storage backends matching the expression to meet the target replica count, hence the requirement cannot be satisfied — unless the list of supporting storage backends or their parameters change.

Example QoS information

screenshot centered

Space privileges regarding QoS


Privilege Actions
View QoS list and view qos requirements
Manage QoS edit qos requirements

Exercise

Create a QoS requirement for a specific provider

In this exercise, you will set a QoS requirement that will cause your file to be automatically replicated to a certain provider.

  1. Go to the file browser GUI of the space alpha-11p.
  2. Open the data distribution view for one of the previously uploaded files.
  3. Examine the current state of data distribution. Identify a provider with an empty or non-full distribution bar — this will be the target provider for the QoS requirement.
  4. Go to the QoS tab (next to the Data distribution tab in the modal).
  5. Click the Add requirement button.
  6. Click the + sign in the Expression field to add a new requirement operand.
  7. Select the provider property from the dropdown, and then in the next dropdown, choose the identified provider.
  8. Click the Add button to finalize the condition.
  9. Click the Save button to persist the new QoS requirement.
  10. Wait for a moment until a green icon appears next to your requirement. Then, inspect the data distribution.

Storage QoS parameters

Apart from the rudimentary provider and storage built-in parameters, storage backend administrators can specify arbitrary custom parameters.

  • these parameters can then be referenced when constructing QoS requirements,
  • both numerical parameters (such as delay=100, priority=1 etc.) and custom keyword parameters describing characteristics (e.g. kind=scratch, geo=FR, etc.) can be defined.


See the documentation here.

Exercise

Specifying custom QoS storage parameters 1/2

Identify the storage backend that supports the space alpha-11p.

  1. Go to the administration panel of your Oneprovider cluster (see Clusters main menu), and then navigate in the sidebar to the Spaces view.
  2. Click on the entry related to the support of space alpha-11p.
  3. Find the Assigned storage backend information.

Exercise

Specifying custom QoS storage parameters 2/2

  1. Divide into two groups — the first group will assign information to their storage backends that they are of scratch kind, and the second group will assign long-term.
    • Providers with a name at least 7 letters long: scratch
    • The rest: long-term
  2. Navigate in the sidebar to the Storages view, click on the previously identified storage backend, and click on the Modify button next to its name.
  3. At the end of the form, add a new entry in the QoS parameters section:
    • key: kind
    • value: scratch or long-term (see pt. 4).
  4. Click the Save button.

Exercise

Creating QoS requirements based on custom storage parameters 1/2

  1. Go to the file browser of space alpha-11p.
  2. Find the directory with your files, right-click on it, and select the Quality of Service option.

Add a requirement that will enforce 2 replicas of the directory on scratch storage.

  1. Click the Add requirement button.
  2. Change the Replicas number field value to 2.
  3. Click the + sign in the Expression field to add a new requirement operand.
  4. Select the kind property from the dropdown, and then in the next dropdown, choose the scratch option.
  5. Click the Add button to accept the prepared condition.
  6. Click the Save button to persist the new QoS requirement.

Exercise

Creating QoS requirements based on custom storage parameters 2/2

Add a second requirement — one replica on long-term storage, but not in Paris or Lyon.

  1. Choose the action to add a new requirement.
  2. Start with inserting the EXCEPT operator.
  3. Fill in the kind equal to long-term condition on the left-hand side.
  4. Insert the OR operator on the right-hand side.
  5. Fill in to achieve the final compound condition and Save.
  6. After a while, inspect the Data distribution tab.

Exercise

screenshot centered

Question

Now my data is physically where I want it, with the desired redundancy. But this happens at the expense of additional disk space.

Where can I find detailed information on how much physical space my directories occupy? And how has this occupancy changed over time?

Directory size statistics

Onedata collects time statistics regarding the sizes of directories, including their physical distribution on different storage backends. They cover:

  • the number of files and directories,
  • logical size,
  • physical size on each storage backend separately.

Exercise

Check the directory size statistics

  1. Go to the file browser of the space alpha-11p.
  2. Use the menu next to the path breadcrumbs to open the Information view about the space root directory.
  3. Switch to the Size stats tab.
  4. Click on the Show size statistics per provider link, and inspect the stats.
  5. Examine the size charts.

Check the data distribution of the space

Hopefully, we should get a nice distribution over the 11 providers.

Next chapter:

Metadata, Data discovery — practice