First steps in GUI

Log in to the Onedata Demo instance:

  • visit demo.onedata.org,
  • if you have an EGI or Google account, log in with them,
  • otherwise, ask the presenter to provide credentials for a test account.
screenshot

Dashboard Overview

After successful login, you'll see a page that consists of the navigation bar, the sidebar, and the main view. Within the navigation bar, you'll find the following tabs:

  • DATA — access to your spaces and data management tools,
  • SHARES — shared data collections,
  • PROVIDERS — providers supporting your spaces,
  • GROUPS — management of your groups,
  • TOKENS — creating and consuming tokens,
  • DISCOVERY — data discovery tools,
  • AUTOMATION — data processing workflows,
  • CLUSTERS — admin tools.
screenshot

User profile page

  1. Click on the tab with the user profile icon at the bottom-left of the navigation bar.
  2. Choose Manage Account from the context menu.
  3. On the Profile page, you can:
    • Change your full name.
    • Change your username.
    • View your user ID.
    • Link other social/federated accounts.
  4. Adjust your full name and username, if needed (especially if using a test account).
screenshot

Join the Workshops Group

  1. Proceed to the TOKENS tab.
  2. In the top section of the sidebar, click the Consume button.
  3. Paste the following token into the Consume token input:
    MDAxZWxvY2F00aW9uIGRlbW8ub25lZGF00YS5vcmcKMDA5M2lk
    ZW500aWZpZXIgMi9ubWQvdXNyLTFjNTkzN2FhNzFmY2JmMmNmN
    WExMmVhMTNhYmQ5ZjkxY2hmY2JmL3VqZzo2NzAyZWVhN2ZmNWY
    wZWFiNDE2ZTY5MWM3MzcxMTg1OGNoY2YyNDovNTIwYWVkY2NlO
    ThmMjZhYTY1MDNkYjFjOTRkYzQ5NTRjaGM3NDMKMDAxYWNpZCB
    00aW1lIDwgMTcwMjA2MjAwMAowMDJmc2lnbmF00dXJlIOMcz5H
    44uPvJS1YDP7zecfhxIGIP8gOPSK2Bhz4CZ026Cg
    
  4. Confirm, then you will be redirected to the view of the newly joined group.
  5. You are now a member of the Workshops group, which will be used throughout the workshops.
screenshot

Exploring Groups

  1. Your groups are listed in the sidebar.

  2. The All users group is an automatic membership for anyone who logs into Onezone (optional and configurable). Take a look — you won't be able to see the other members (we don't want to disclose personal information).

  3. In the Members view for Workshops:

    • View the list of USERS in the group.
    • Expand your row to view your privileges.

Creating a group

  1. Click on the + button in the GROUPS sidebar.
  2. Enter a meaningful group name, e.g. "<your name> first group."
  3. Click on the Create new group button.

screenshot no-margin centered

  1. On the Members page, click on the action menu at the right side of the USERS row. screenshot centered
  2. Choose Invite user using token from the context menu.
  3. Copy the token and send it to the colleague on your right.
  4. Proceed to the TOKENS tab and use the Consume action.
  5. Consume the token received from the colleague on your left to join their group.
  6. You should see that you have joined the colleague's group; view the Members.

Group management privileges


Privilege Actions
View group view group members and memberships
Modify group edit group details
View privileges view group members privileges
Set privileges edit group members privileges
Remove group remove group
... manage group's memberships in other resources


See the documentation here.

Exploring Spaces

  1. Navigate to the DATA tab using the navigation bar.
  2. The view for the first (and only) space you have access to will open.
  3. The Overview tab presents a summary of the space in a graphical form. screenshot centered

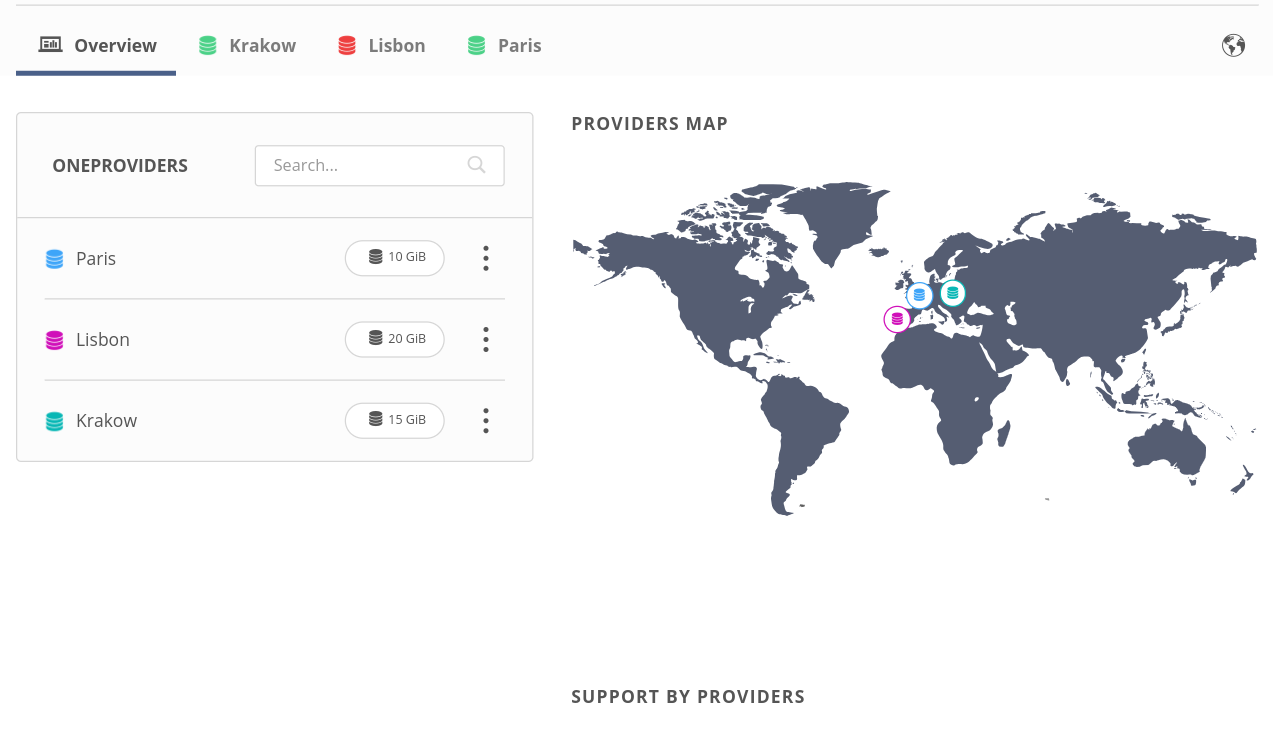
Providers supporting the space

Click on the PROVIDERS tile, the PROVIDERS MAP tile, or the Providers tab in the sidebar.

Here you can view more details about the supports for your space.

screenshot no-margin centered

Other tabs in the space sidebar will be covered in the chapters that follow.

Create a new space and invite members

  1. Click on the + button in the DATA sidebar.
  2. Enter a meaningful space name, e.g. "<your name> first space"
  3. Click on the Create new space button.

    The space has been created, but there is currently no support granted and no data can be stored in the space. The process of adding supports will be covered in the upcoming chapters.

  4. Go to the Members of your space in the sidebar.
  5. Click on the "three-dots" action menu in the GROUPS row.
  6. Choose Invite group using token from the context menu.

    Tokens can be used to invite individual users or whole groups. All members of the group added as a member inherit access to the space.

  7. Copy the token and send it to the colleague on your left.
  1. Consume the token received from the colleague on your right to join their space. Choose the previously created group.

screenshot centered

  1. Go back to the Members page of the space that you have created.

  2. You should see the group of the colleague on your left listed as a member of your space.

  3. On the top of the Members page, change the view option to Effective.

    Effective members are those that effectively have access to the space, either by direct memberships or those inherited via groups.

    screenshot

  4. You should see the colleague on your left listed as an effective member of your space. Inspect their privileges — they are inherited from the group (should be the same).

  5. Switch to the Memberships view at the top. Enable the Show descriptions option.

  6. Expand the row for your colleague to view their membership path.

Modifying privileges

  1. Still on the Members view for the space, switch to the Direct privileges view.
  2. Locate the group of the colleague on your left and expand the row.
  3. Using toggles, revoke all privileges of the group and save changes.
  4. Confirm that you can no longer see the members of the space created by the colleague on your right.

Space management privileges


Privilege Actions
View space view space members and memberships
Modify space edit space details
Remove space remove space
View privileges view space members privileges
Set privileges edit space members privileges
... manage space's memberships in regard to other resources


See the documentation here.

Creating group hierarchies

  1. Communicate with all participants to identify what organization they come from (e.g. CNRS). Cooperate with others from your organization in this exercise. People who are the only representatives — together establish the "Mixed" organization.

  2. Designate a person from your organization that will be doing the next steps. The others are allowed to come over and play "shoulder monsters", watching the designee's steps and commenting.

  3. Designated person — create a group named after your organization.

  4. Designated person — add it as a child to the Workshops group, using the Add one of your groups action.

    screenshot no-margin centered

  1. Designated person — send a token to join the group to the other organization members (the same token can be used multiple times).
  2. The others — consume the tokens to join the group.
  3. Designated person — grant all group privileges to the others, use the bulk edit action (available when you have selected multiple members from the list).
  4. Everyone — navigate to the Hierarchy tab for the Workshops group and inspect the hierarchy.
  5. Everyone — hover over your organizational group (Workshops' child group) and click the gear button to Add child group -> Create new group, achieving a three-level hierarchy; make up any name.
  6. Everyone — watch the hierarchy get more interesting as people add more groups.
  7. Everyone — take a minute to play around with other actions or build a more sophisticated hierarchy.
  8. Everyone — go to the Members of the training-scratch space, switch to Effective Memberships, and observe that all members have at least two membership paths. Enable the Show descriptions toggle to see our GUI generate little poems.

A note on members, invites, privileges

All resources in Onedata reuse the membership model presented in previous exercises:

  • Groups
  • Spaces
  • Harvesters (data discovery)
  • Automation inventories
  • Handle services (Public Data)
  • Clusters (Onezone/Oneprovider admin area)

Users and groups can be invited/added as members and assigned granular privileges.

Let's clean up a bit

After finishing the exercises, delete the spaces you created. The groups may stay.

Use the "three-dots" menu to locate the appropriate action.

screenshot centered

screenshot

Exploring Providers

  1. Visit PROVIDERS in the navigation bar.
  2. Click on one of the available providers on the list in the sidebar.
  3. Take note of the geographical representation of providers on the map.
  4. Click on the icon of a different provider.
  5. In the popup that has appeared, you can view the list of supported spaces.
  6. Click on the training-scratch space on the list to open the file browser, served by the chosen provider.
  7. You are now ready for the data management chapter!

Next chapter:

Data management in GUI — practice