# Archives
# Overview
An Open Archival Information System (opens new window) (OAIS) reference model describes a conceptual framework for an archival system dedicated to preserving and maintaining access to digital information over the long term. Onedata implements the core principles of the framework with the archives feature. The concept of the archives is highly coupled with the datasets feature of Onedata, so it is recommended to read the datasets' documentation first.
# Submission Information Package (SIP)
The Submission Information Package (SIP) of the OAIS model is an Information Package that is delivered to the system for ingest. It contains the data to be stored and all the necessary related metadata. The SIP is ingested into the system and serves as a basis for the creation of an Archival Information Package (AIP) and a Dissemination Information Package (DIP).
The SIP can be pushed into the Onedata archiving system through:
- Web GUI — by uploading the data,
- REST API,
- CDMI,
- S3 (rclone, aws-cli, s3cmd, MinIO…),
- Oneclient and OnedataFS.
SIP pull in the Onedata archiving system can be realized through:
- Oneprovider — data import,
- Automation engine:
- BagIt (fetch),
- Fetch.txt,
- other custom scripts.
# Archives in Onedata
An archive is a snapshot of a dataset created at a certain point in time.
Archives are immutable and stored within a space, lying in a special directory detached from the regular file tree. They can be accessed using the specialized browser of datasets and archives. Note, that custom metadata of the files also gets snapshotted and can be browsed in the archive.
The process of creating an archive comes with several options:
- different layouts (plain and BagIt) — the structure of the files in the created archive,
- creation of nested archives — hierarchically-created archives for datasets with nested structure,
- incremental archives — reusing the unchanged files between snapshots,
- including DIP — adding a Dissemination Information Package view for the archive,
- possibility to follow symbolic links if they are present in the dataset.
# Creating archives
To create archives of a file or directory, you should establish a dataset on them first.
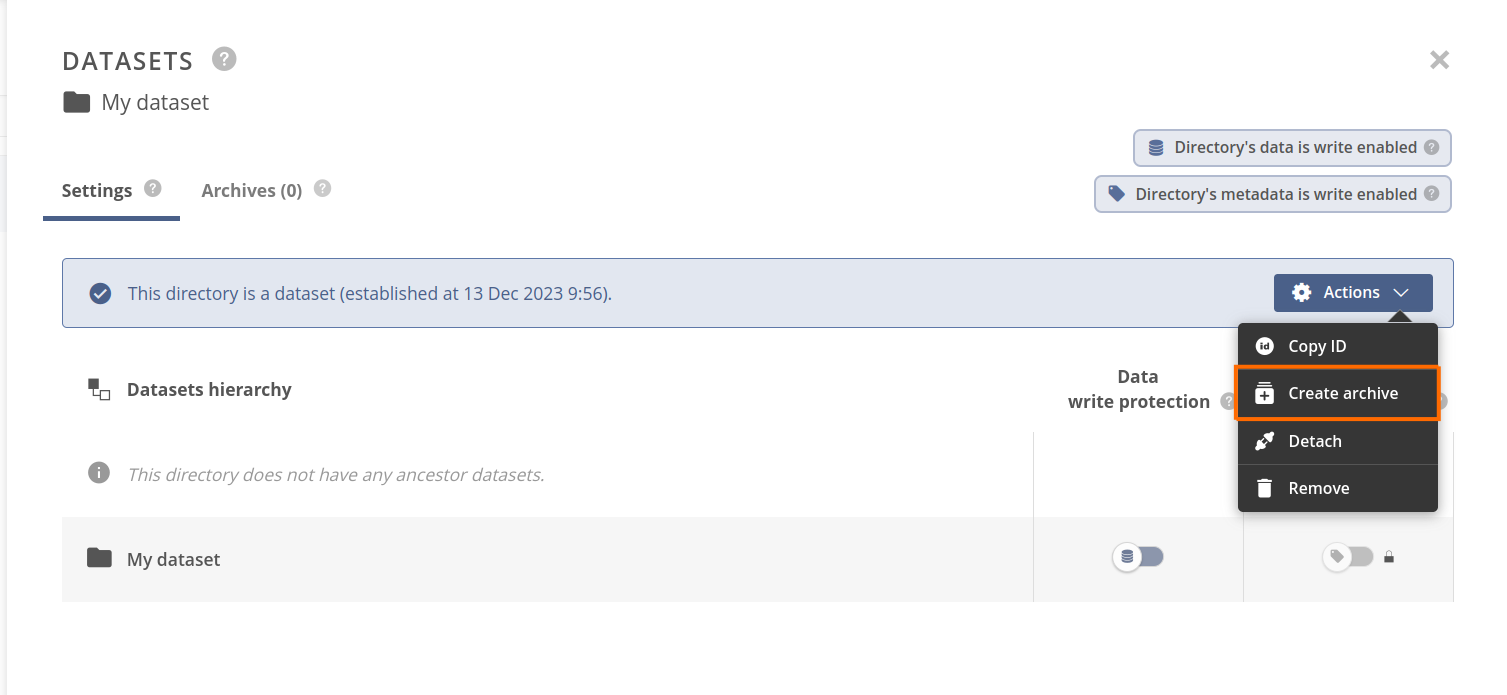
- Open the Datasets' panel for a selected file or directory and click on the Create archive action of the dataset actions context menu.
- In the Create archive modal, write a description of the archive and use the default archiving settings.
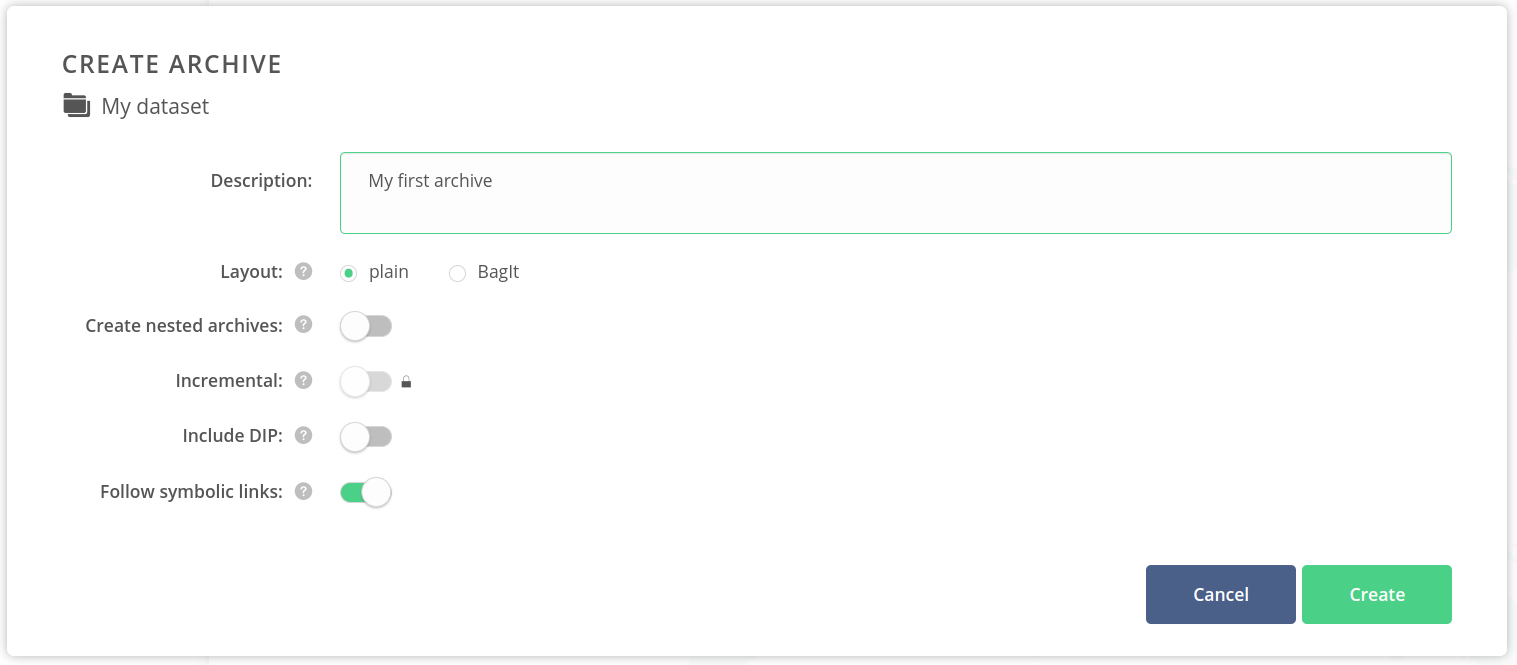
Click on the Create button.
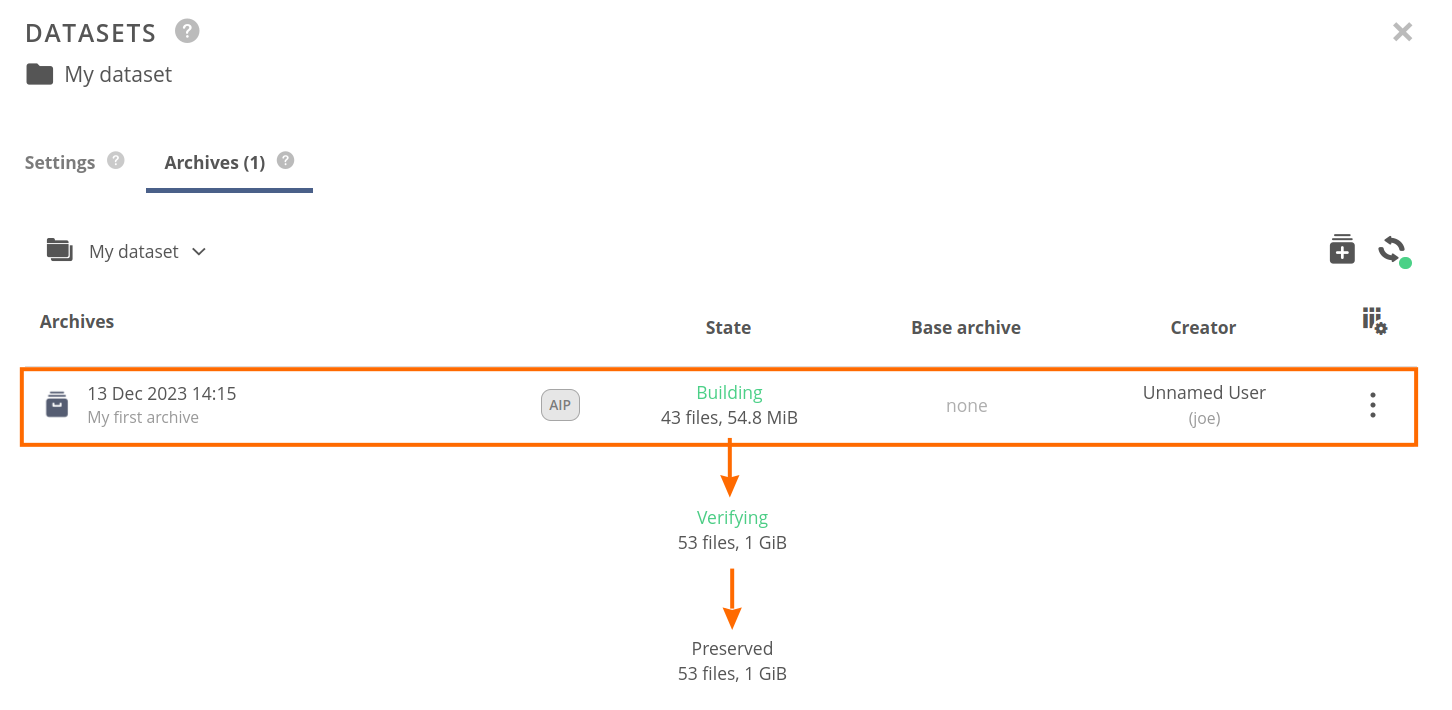
You should see the archives list for the current dataset. It includes the newly created archive and shows archiving progress through the following stages:
- Building — when the archiving is still in progress; shows counters of currently archived files and data size,
- Verifying — when data archiving is finished and archive integrity is checked,
- Preserved — when the archive data copy is completed.
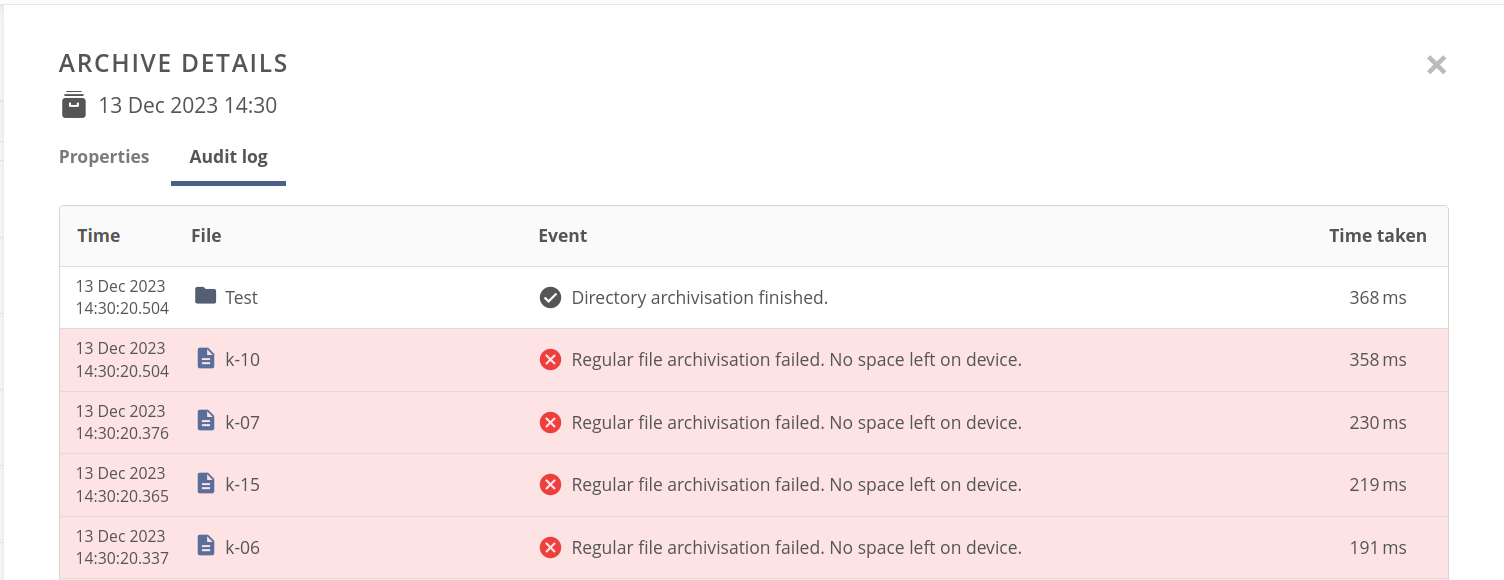
In case the archiving process fails, the state of the archive becomes:
- Failed — when some data could not be archived,
- Verification failed — when data have been copied, but it is inconsistent with the source.
You can click on the Failed badge and open an archiving audit log with error reason information.

# Cancelling archiving
The archiving process can be cancelled.
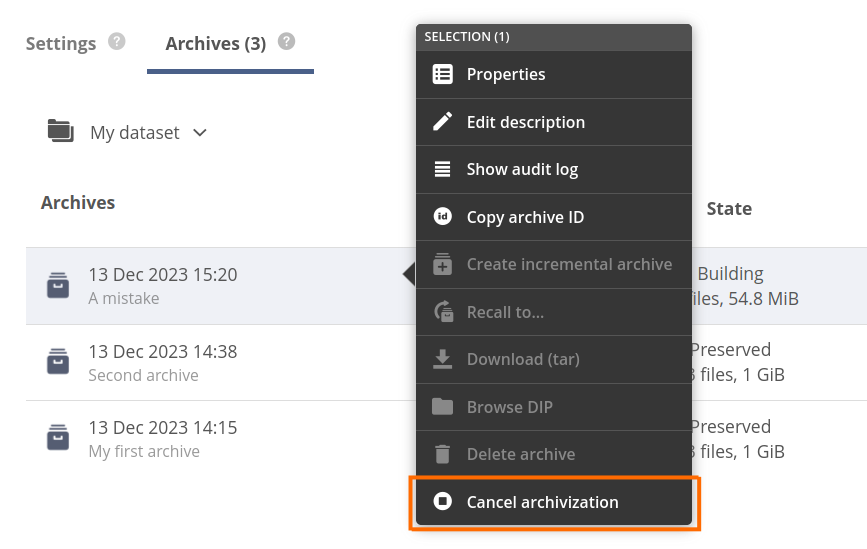
- Open the context menu for an archive in the Building state and choose Cancel archivization.
- In the opened Cancel archivisation modal decide if the partially created archive should be deleted (the data that has been already copied) — the default is to delete the incomplete archive.
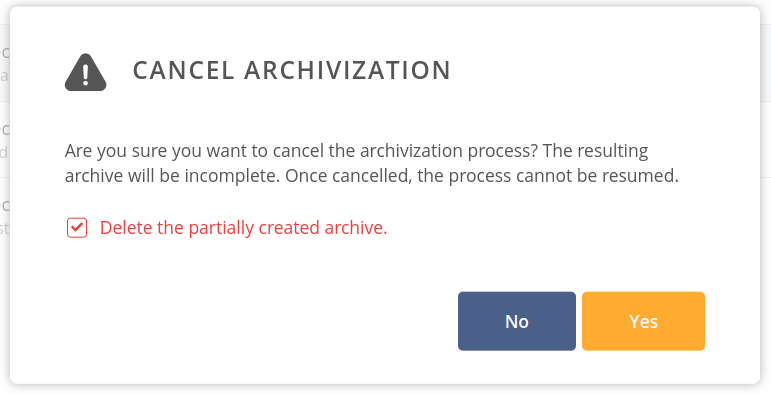
- Click on the Yes button to confirm canceling.
If you have decided to delete the partially created archive, it will disappear from the list.
If you unchecked the prompt, the archive will stay on the list with the data copied so far — it can be normally browsed. You can delete it at any time.

# Browsing archives
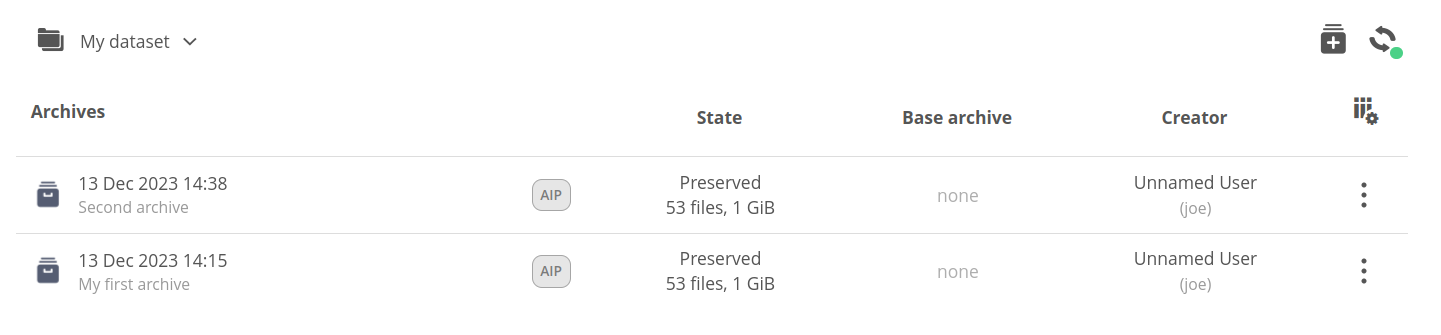
A list of snapshots created from a single dataset can be browsed using the archives list.
The view consists of:
- breadcrumbs — showing
- the root of the dataset archives list,
- selected archive,
- path of a browsed directory inside the archive,
- the refresh button — for optional view refresh, which is not needed in regular usage, because the list is auto-updated,
- table column headers — presenting information about archives:
- State — what stage of lifecycle the archive is in and how much data it contains (also when the archive is still creating),
- Base archive — the base of the incremental archive (if applicable),
- Creator — Onedata user that created the archive (can be different from dataset owner),
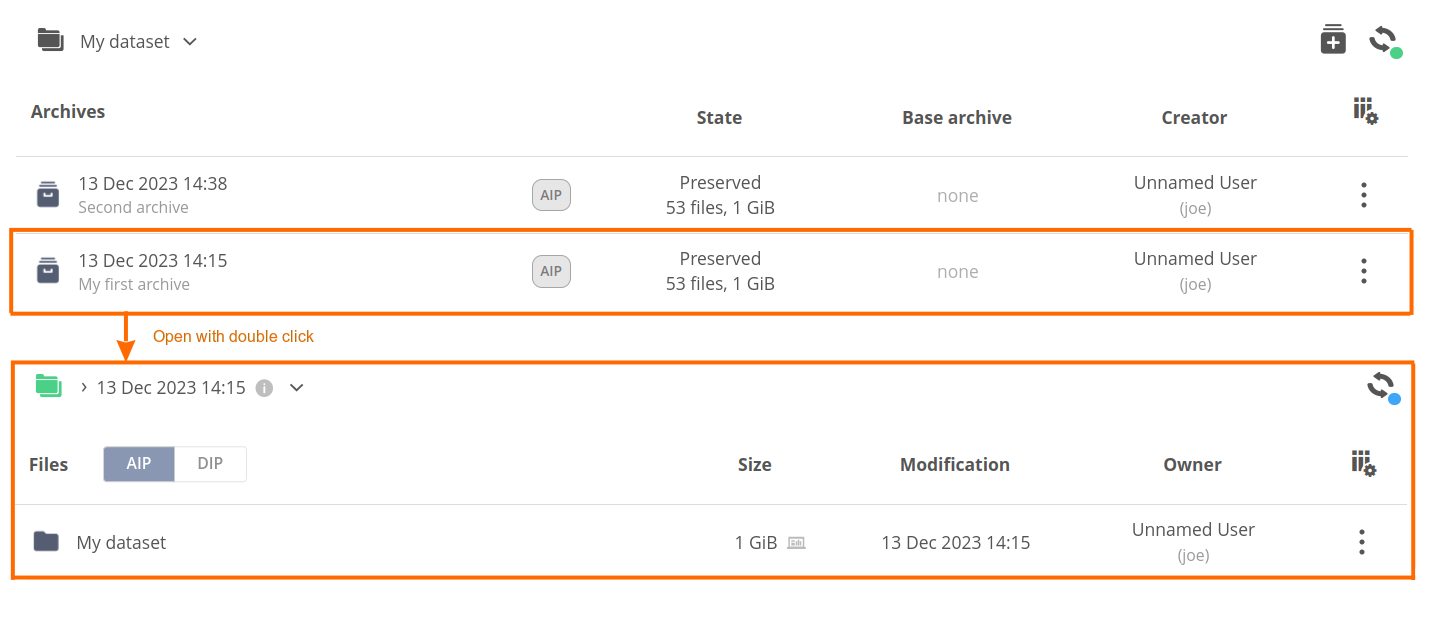
- archives/files list — showing
- the dataset archives when you are in the dataset root,
- or the files inside the archive if you enter some archive.
You can open the context menu for an archive or browse its contents by double clicking on it.
The archive row can also contain various state or property description badges like “DIP” or “BagIt” (described later).
# Archive files browser
The archive files browser works just as a regular web file browser except it offers read-only access both for data and metadata. You can also share the archived files/directories, manage QoS and transfer the data between providers.
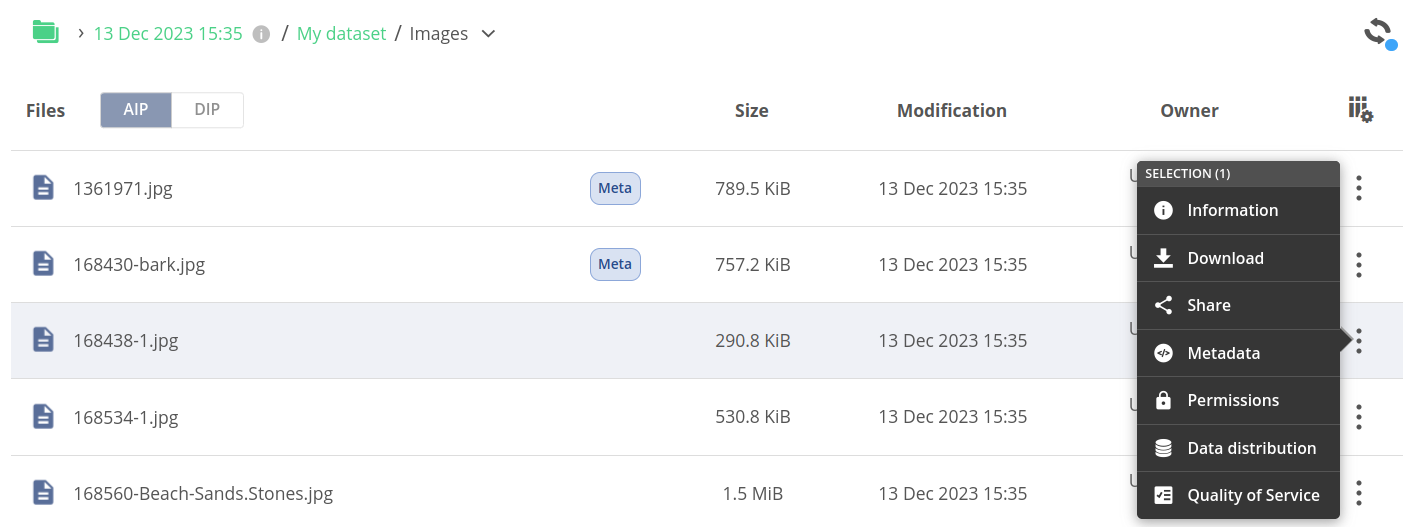
# Archive actions
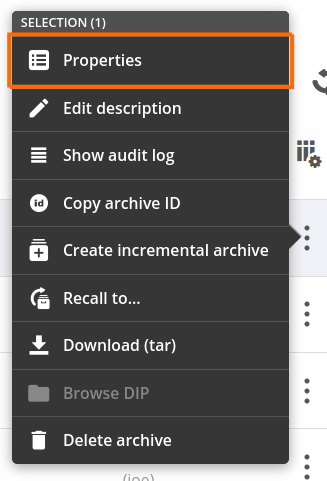
An archive item in the browser offers the following context actions:
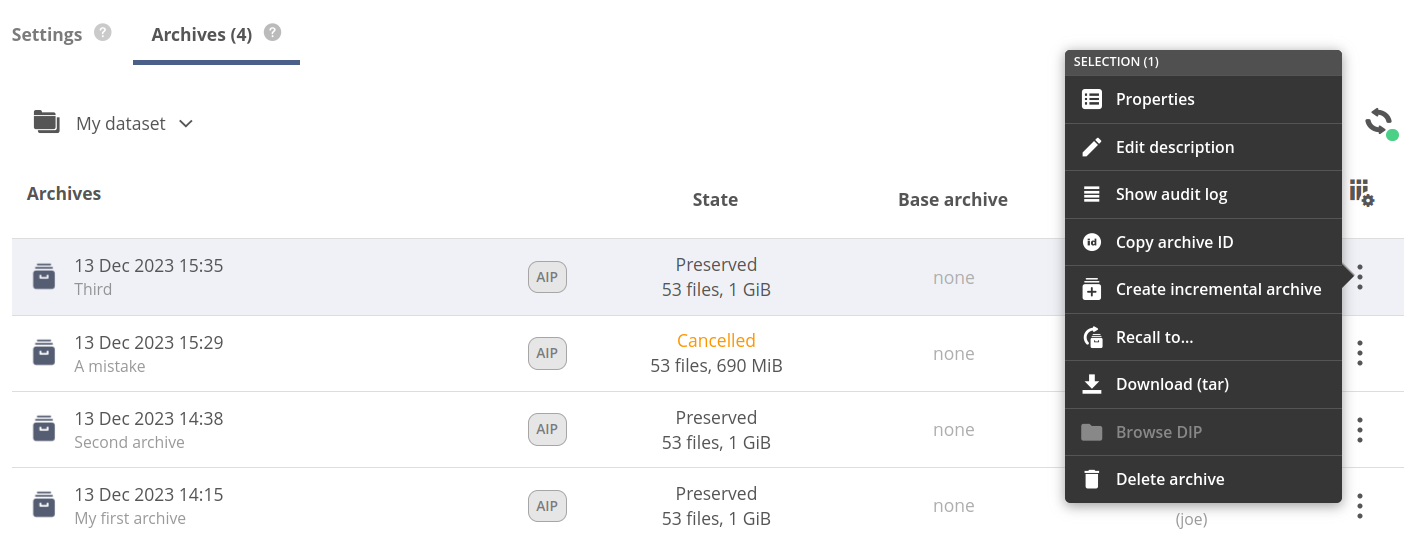
- Properties — opening the archive properties tab in the archive details panel, which shows the basic info about archive configuration,
- Edit description — editing the archive description,
- Show audit log — showing the archiving audit log tab in the archive details panel,
- Copy archive ID — instantly copying the archive ID into the clipboard,
- Create incremental archive — opening the Create Archive modal with a subject archive selected as a base for the incremental archive,
- Recall to... — opening the modal for recalling the archive,
- Download (tar) — downloading the tar package with the archive contents,
- Browse DIP — opening the DIP (Dissemination Information Package) view of the archive files browser (if available),
- Delete archive — opening the modal for deleting the archive.
# Archive details panel
The archive details panel is accessible from the context menu of archive.
The panel consists of two tabs:
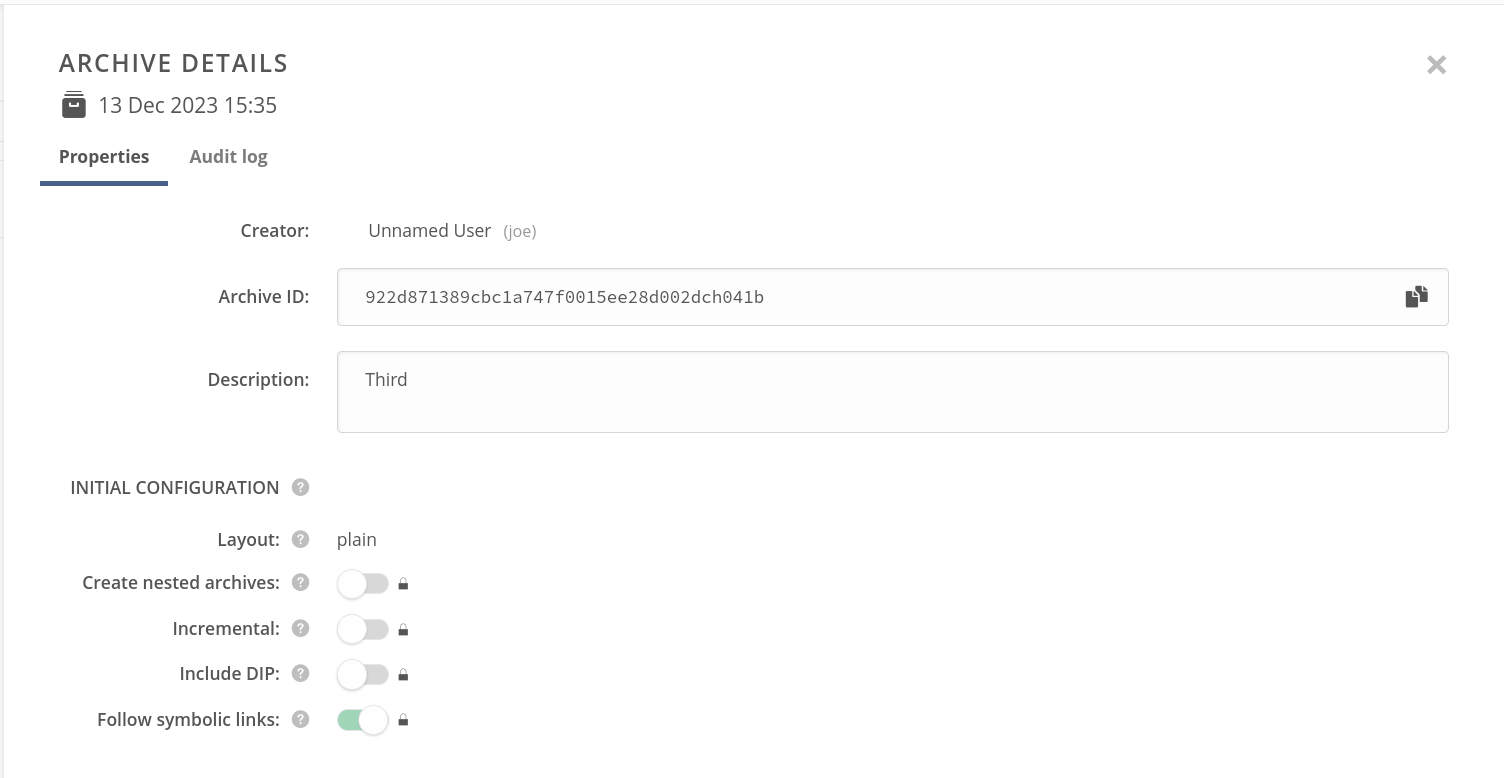
Properties — showing the basic information about the archive, including the editable archive description and initial configuration set when the archive was created,
Audit log — allowing you to browse the log from the archive creation.
# Archive audit log
The archive audit log consists of entries for every file or directory that was archived.
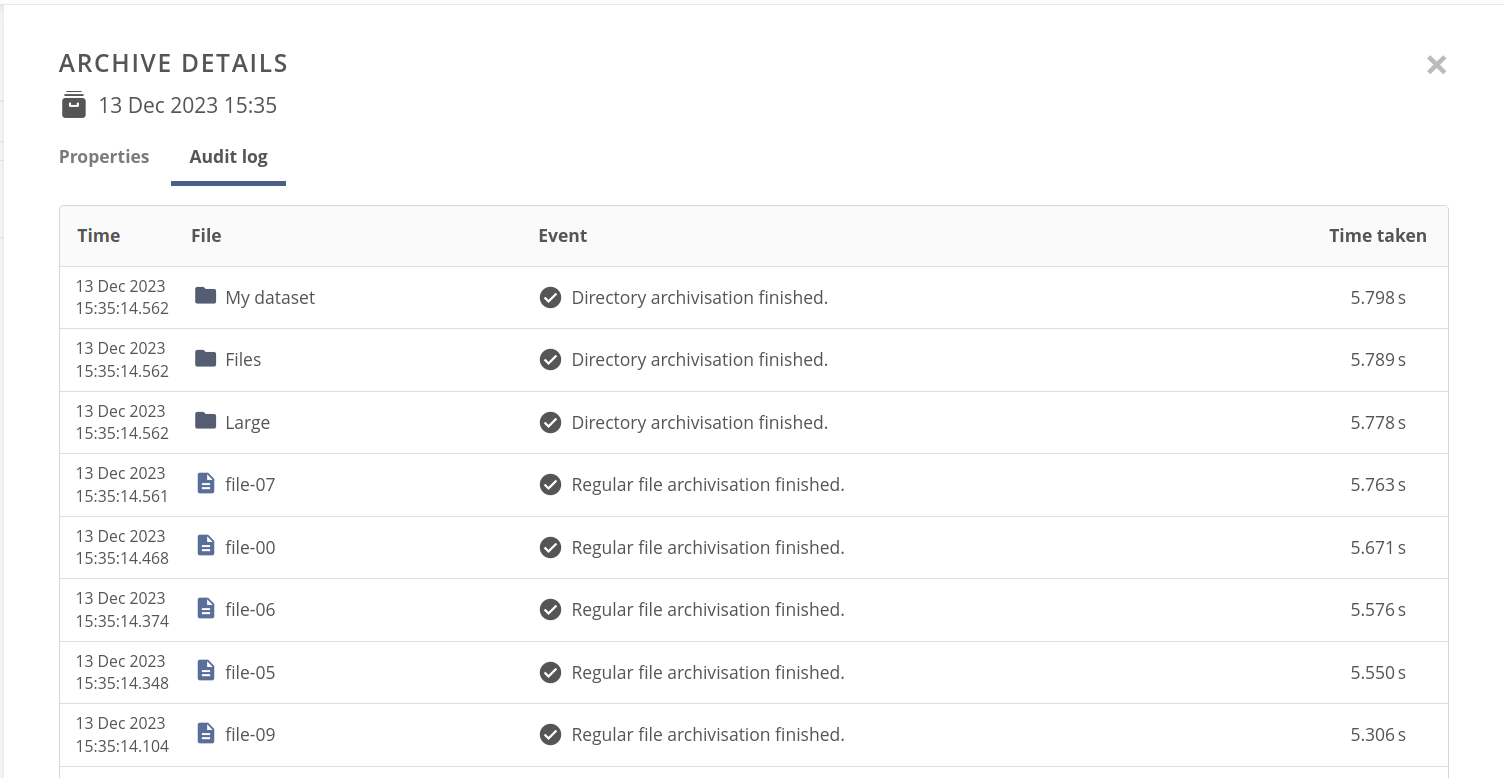
The file or directory could be archived successfully or not, and in both cases the log entry shows granulated details about the process, such as archiving times, file location, and its ID.
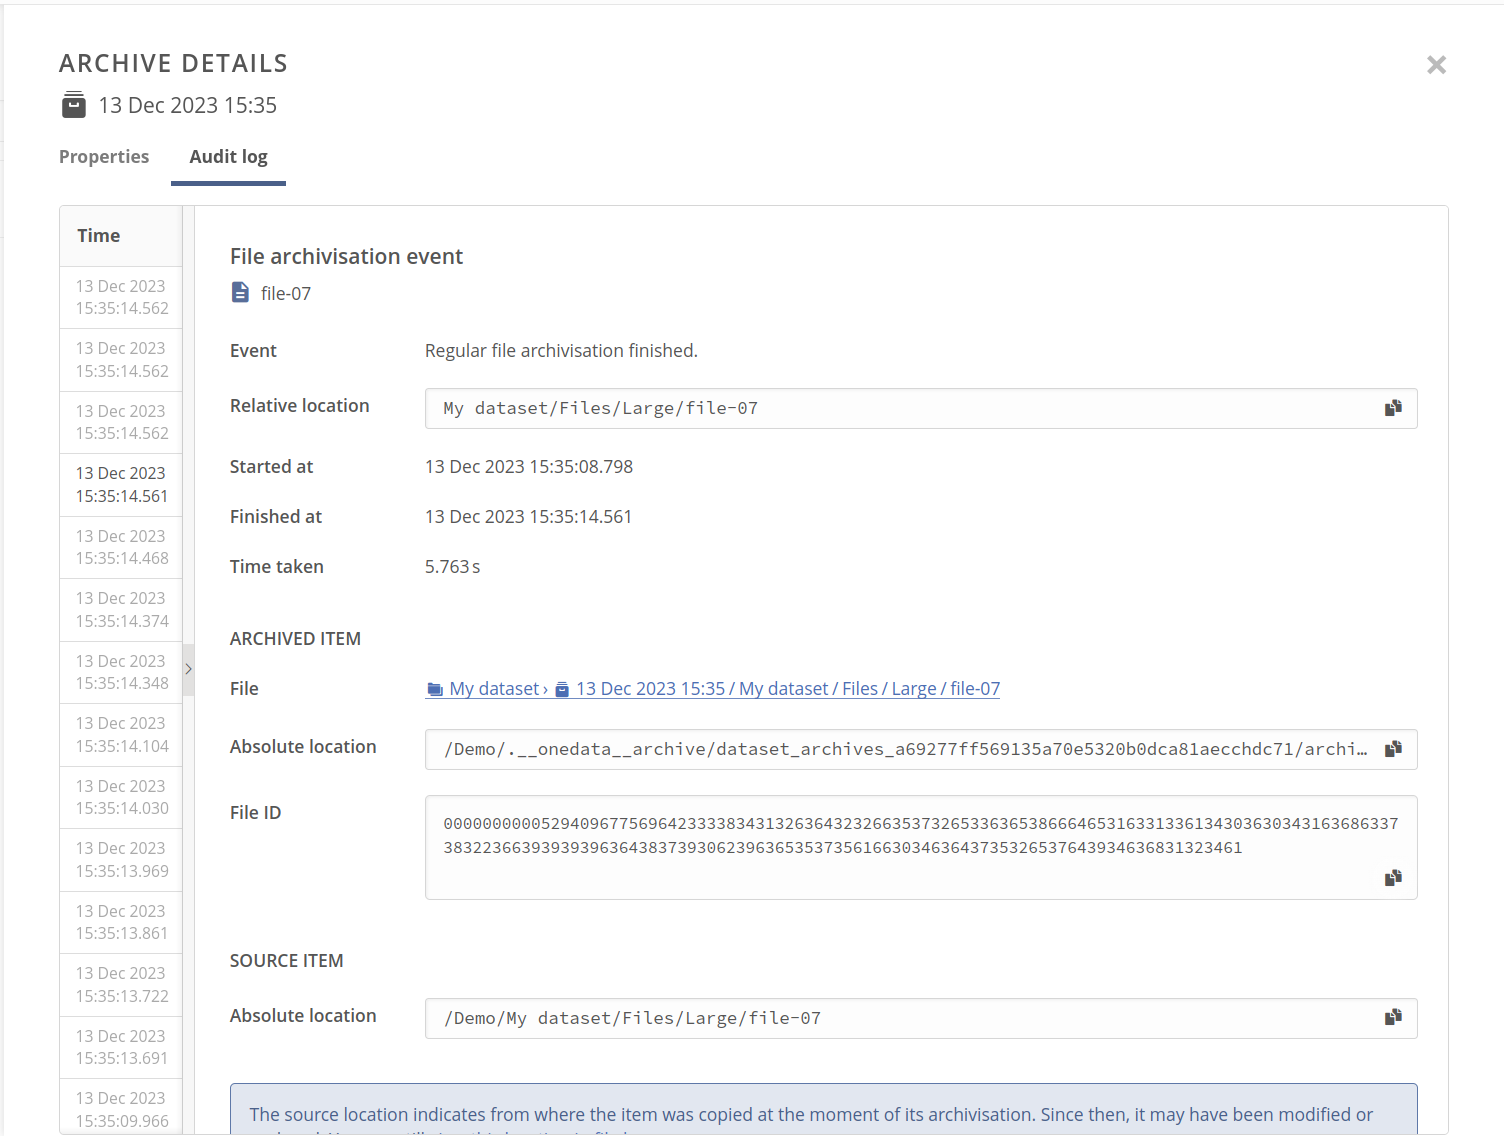
In case of the archiving failure, you can also check the error reason.
NOTE
In rare cases, the data could be archived, but it has been not successfully validated against its source — in this situation, there are entries both for successful data archiving and verification error in the log for the file.
# Incremental archives
A default, regular archive is a full copy of the dataset contents, occupying an additional storage quota. Storage space can be saved by creating incremental archives, whenever possible.
An incremental archive is created upon the chosen base archive and reuses all files that haven't been modified between the snapshots, creating hard links to them (which take no storage space). Only the modified and new files are copied.

The above diagram shows two modes of creating subsequent archives for the dataset:
- the Experiment A dataset's most recent archive is created using the incremental option, which shares the unmodified files with the former archive using hard links,
- while the Results dataset's archives are created separately — each archive has a separate copy of the data, even unmodified.
NOTE
You can delete the base archive without loss of data in the incremental archives — the data remains until the last reference of the shared file data is deleted.
# Creating incremental archives
Open the Archives tab of the Datasets panel for a file or directory that contains an archives list view. Make sure that you have at least one archive already created — if not, create one.
Make sure that the contents of the dataset have been modified since the last taken snapshot, e.g. upload new files into the dataset. This step is necessary to see how the increment is handled later.
Open the context menu for an archive that should serve as a base for a new incremental archive, and choose Create incremental archive. Files that haven't been modified in the dataset, compared to the selected archive, will be hard-linked instead of being copied.
The Incremental toggle should be enabled and locked in the Create archive modal. The Base archive should indicate the chosen one.
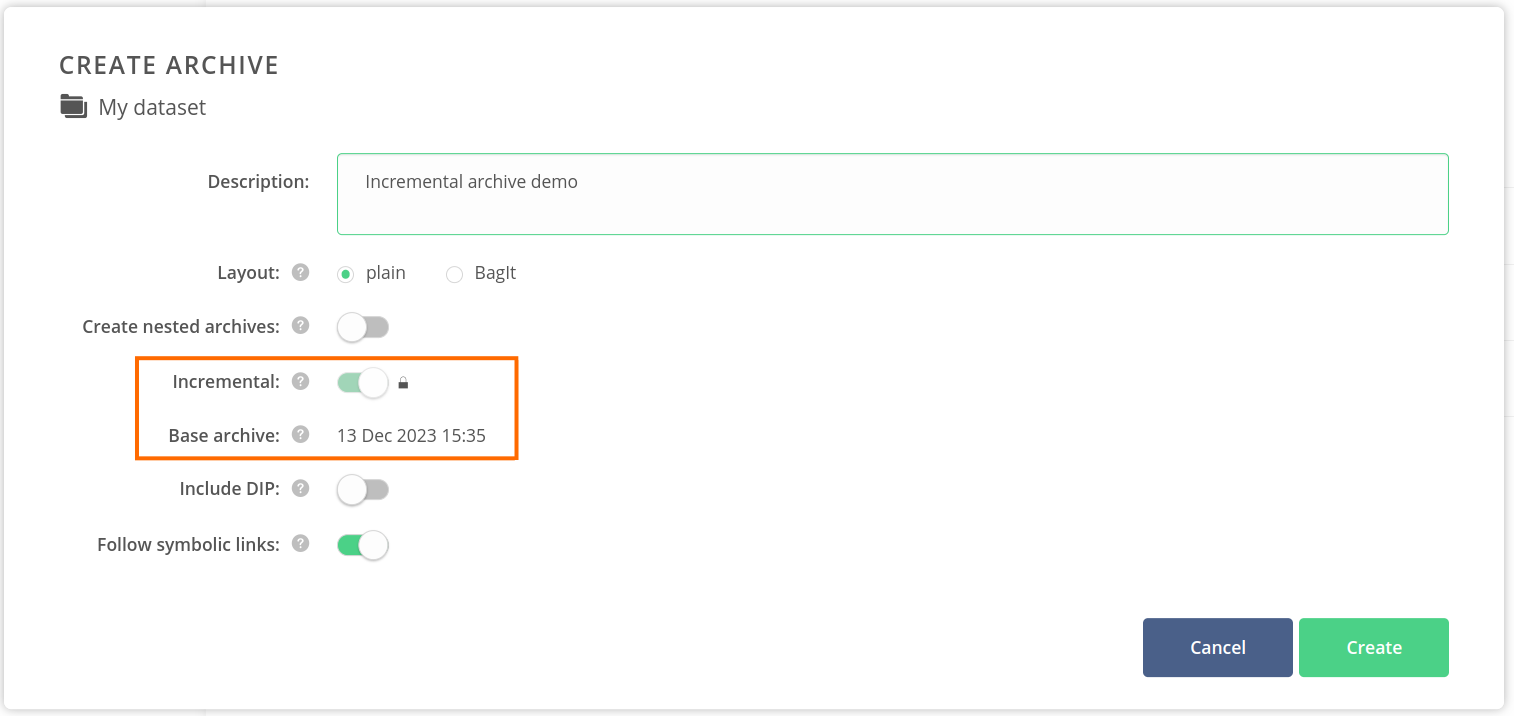
Click on the Create button.
In a few moments, the new archive should pop up on the list. Note the Base archive indication.
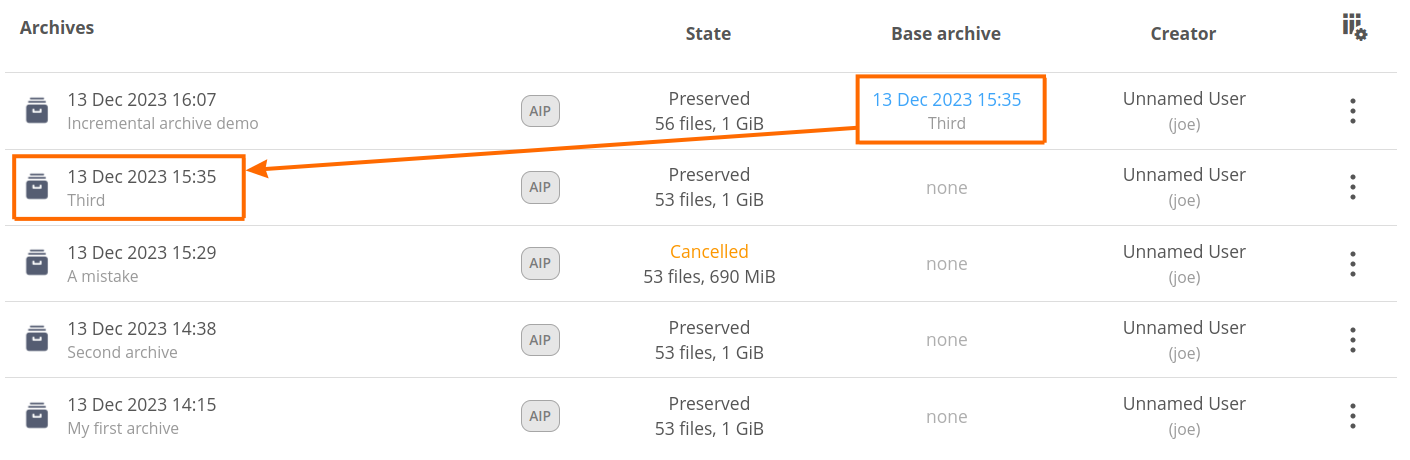
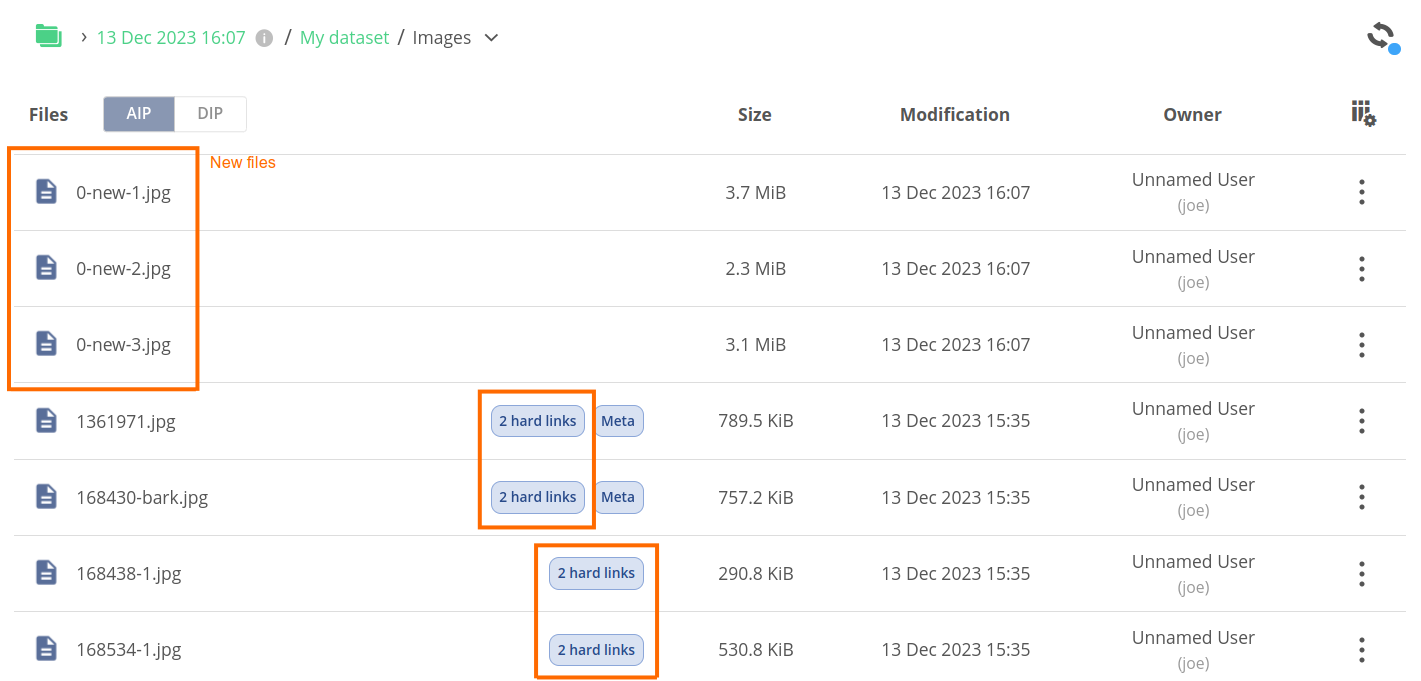
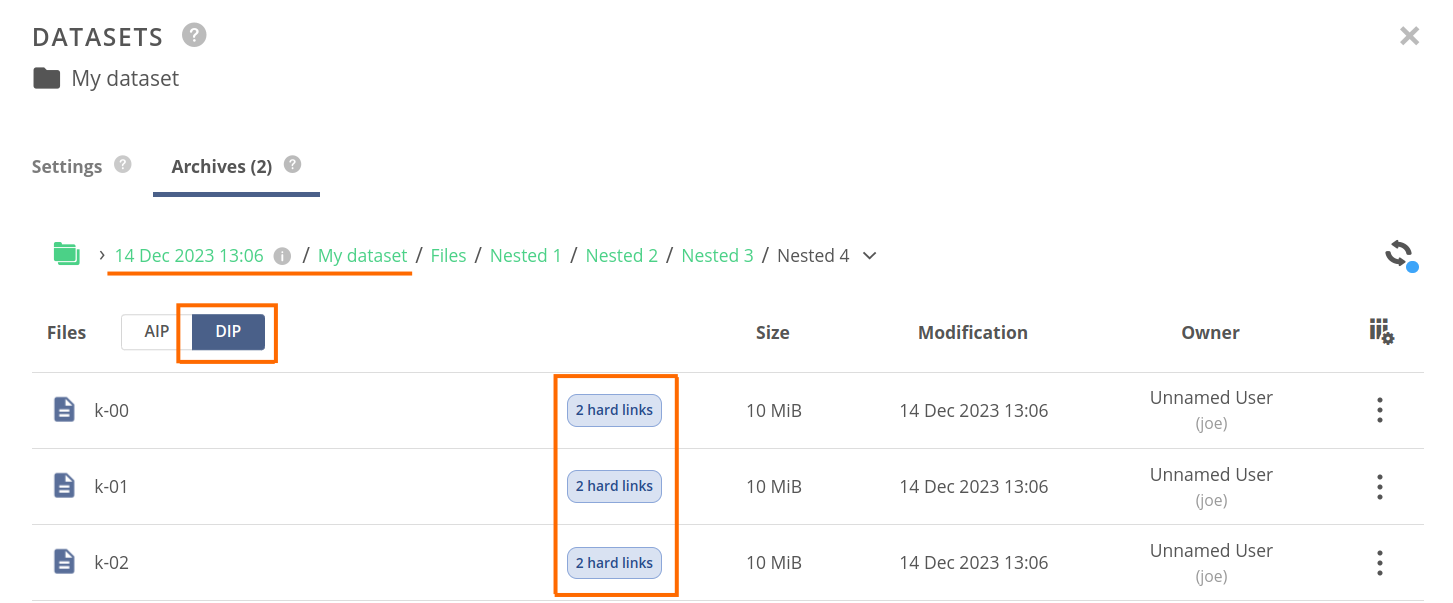
Upon the creation, you can browse the contents of the archive. You will notice that the files, which haven't been changed compared to the base archive, have a hard links badge. The number of hard links typically indicates how many archives share the data. You can check hard link locations by clicking on the hard links badge — it should present paths to files in the other archives.
NOTE
You can create incremental archives from any archive in the dataset, not only the latest one. The difference in the data will be determined from that particular snapshot.
# Nested archives
Nesting datasets allow composing structures of desired granularity. An embedded dataset can be a logical whole that's useful individually, and at the same time be a part of a bigger data collection, vital for its completeness.
A default, monolithic archive is a snapshot of the whole dataset regardless it has child datasets or not. The filesystem of the archive simply contains a copied dataset filesystem tree.
As the dataset nested structures are also important when archives are created, users may choose to create nested archives on the level of ancestor dataset. This way, a set of linked archives will be created.

The above diagram shows the nested archives concept placed in the dataset hierarchy tree. The Experiment A dataset, which has the Results embedded dataset, creates an archive with the nested option enabled. This option causes an automatic creation of archives for all the embedded datasets inside the Experiment A datasets tree — in this case, the Results dataset.
The Results directory, which occurs in the Experiment A archive filesystem tree, is symbolically linked to the archive filesystem created from the embedded Results dataset. This way, while you browse down the contents of the Results directory inside the archive created from Experiment A, you technically browse the contents of an automatically created archive from the Results dataset. You can also browse the archive created from the Results dataset directly.
NOTE
As the child of the nested archive is referenced by the symbolic link in the parent archive, deleting the child archive is not allowed, because it would cause an inconsistency in the parent archive.
# Creating nested archives
You need to have a dataset hierarchy — essentially a dataset established inside the filesystem tree of the other dataset.
Open the Archives tab of the Datasets panel for a file or directory that has a dataset established and has a child dataset.
Open the Create archive modal as described in the creating archives section.
Enable the Create nested archives toggle.
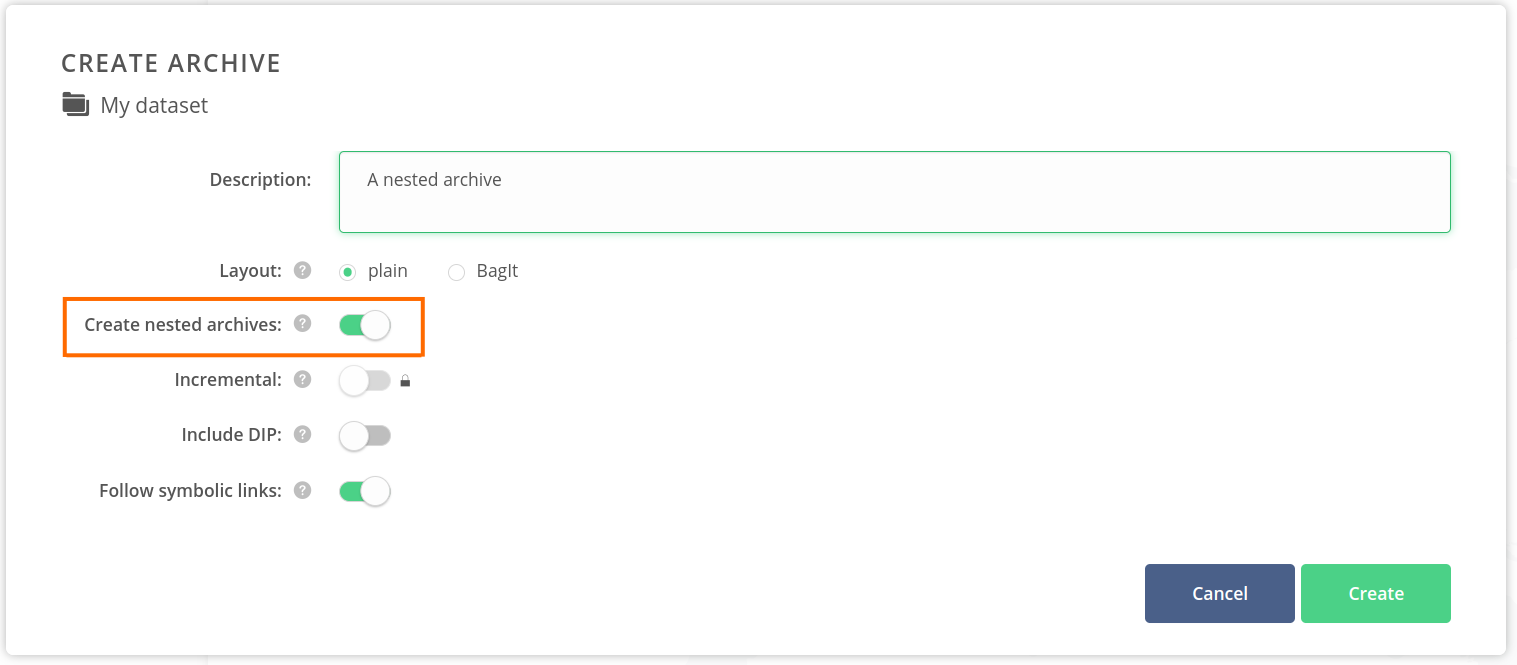
- Click on the Create button.
Upon successful creation, you should see the newly created archive on the list. Browse its contents — note, that the snapshots of nested dataset directories are symbolic links. These links point to the archives that were created from those nested datasets.

Close the Datasets panel, and navigate to the nested datasets in the web file browser, opening their Datasets panel.
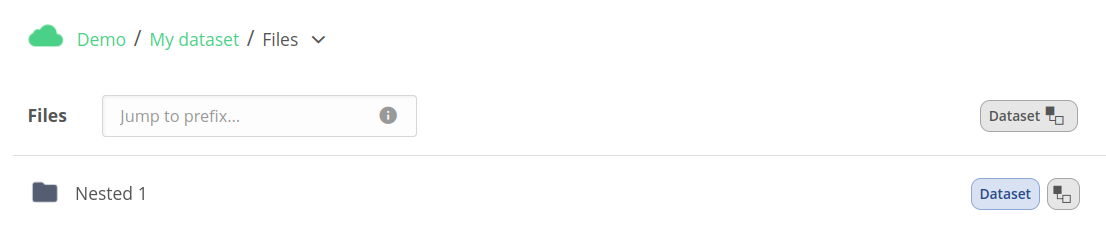
These nested datasets have a new archive automatically created at the time, the nested archive was created for the parent dataset.

Note, that the description of the child archive is the same as that of the parent archive. Browse the archive to find out, that its root is the snapshot of the child dataset root.

# Symbolic links in archives
Following the symbolic links during an archive creation, which is done by default, allows the files or directories to be included from outside the source dataset. Valid links are resolved and their target files/directories are copied to the archive in their place. Invalid symbolic links (not resolvable to a valid path in the space) are ignored and not included in the archive.
If you disable the symbolic links following option upon archive creation, symbolic links are copied to the resulting archive, and their target paths are not modified. Note that these symbolic links may target modifiable files in the space.
NOTE
Symbolic links pointing to files inside the dataset are always preserved, regardless of this setting. Their target paths are reconstructed to point to the corresponding files in the resulting archive.
# BagIt archives and DIP
BagIt (opens new window) is a set of hierarchical file system conventions for organizing and transferring digital content.
A “bag” consists of the “payload” (actual content) with “tags” serving as metadata files documenting storage and transfer details. A mandatory tag file includes a manifest listing every file and its corresponding checksums.
The term “BagIt” is inspired by the “enclose and deposit” method, also known as “bag it and tag it”.
An archive created in BagIt format contains extra tag files in the filesystem tree compared to the source dataset (payload). By default, you access the Archival Information Package of the archive, which presents the extra BagIt structure. Furthermore, by including the DIP, you can also have a view of only the payload of the filesystem, which mirrors the dataset filesystem snapshot.
# Creating BagIt archives with DIP
Start archive creation using the Create Archive modal.
In the modal:
- set Layout to BagIt,
- enable the Include DIP toggle.
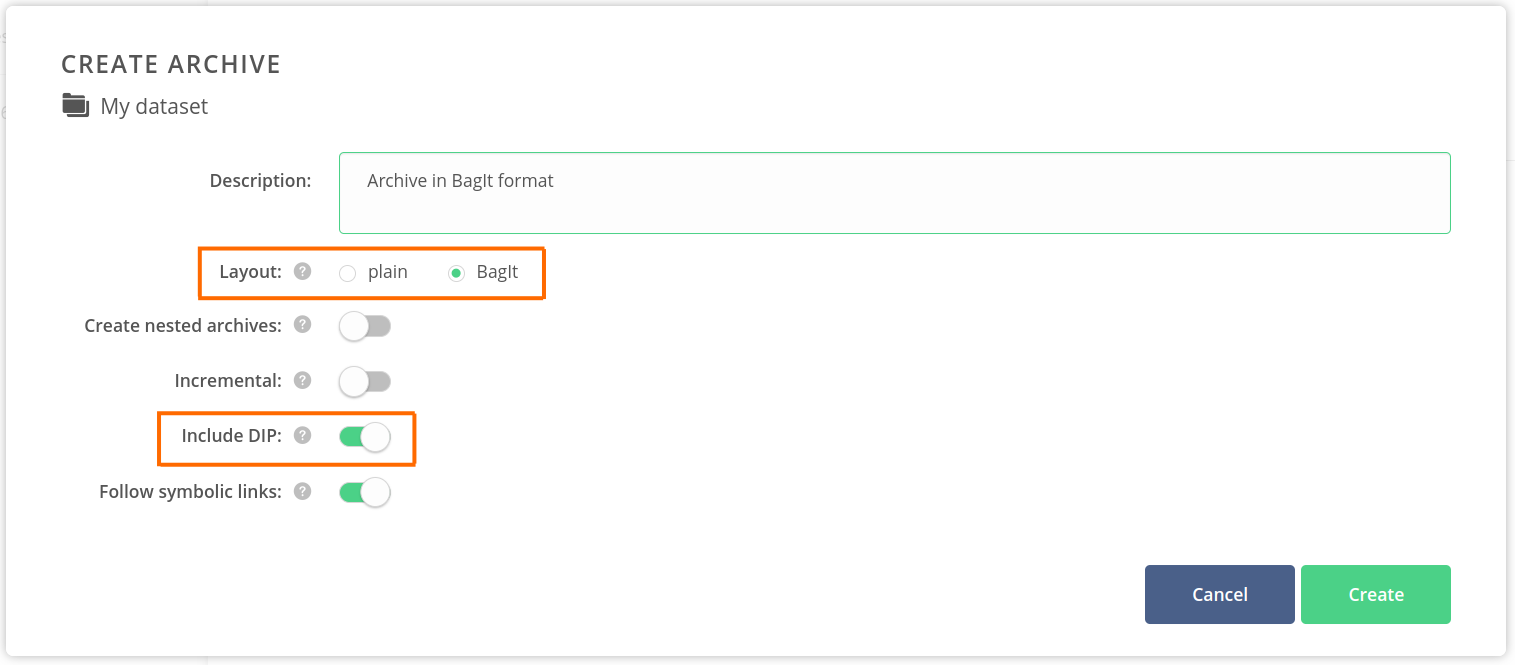
- Click on the Create button.
Upon successful creation, you should see the newly created archive on the list. Browse its contents — note, that the AIP/DIP switcher in the Files column is active and set to AIP.
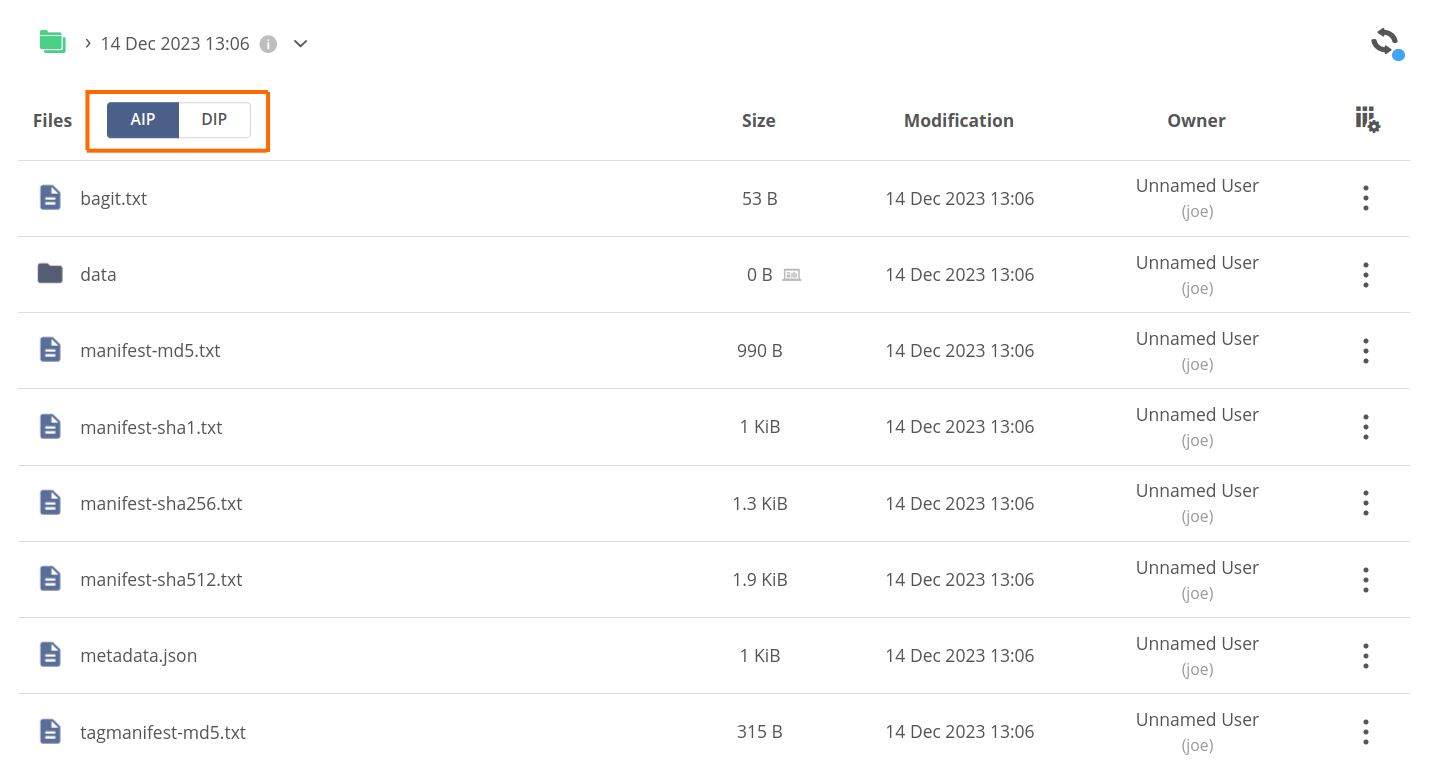
You can see the extra files created in compliance with the BagIt format:
bagit.txt,datadirectory,manifest-*.txt,metadata.json,tagmanifest-*.txt.
The structure of the BagIt archive is described in The BagIt File Packaging Format RFC — Structure section (opens new window).
The data directory contains the payload — a snapshot of the dataset filesystem.
You can use the AIP/DIP switcher in the Files column to change to the DIP view. Now, the file browser shows the exact filesystem structure of the payload without BagIt extra files.
NOTE
AIP and DIP archives are technically two separate archives, but the hard links are used to share the payload, so no additional storage quota is used with the include DIP option. This is the reason, why you see hard link tags on the files in the payload.
# Archive recall
While archives serve as immutable snapshots, the dataset may evolve in time as the data in the space changes. Sometimes it is desirable to bring back a certain snapshot into the space filesystem to work on it.
To do that, users may recall the archive. The process copies the data at the chosen path in the space, creating a new file/directory that is not logically linked to the original dataset.
# Recalling archives
Go to the Archives tab in the Datasets panel of the selected file or directory.
Open the context menu for an archive you wish to recall and choose Recall to...
In the Recall archive panel that has appeared, navigate to the parent directory where you want to recall the archive.
Set the Target directory name at the bottom (if the archive is file-based, then it would be a Target file name). See the result target path at the bottom — the archive will be recalled to that location.
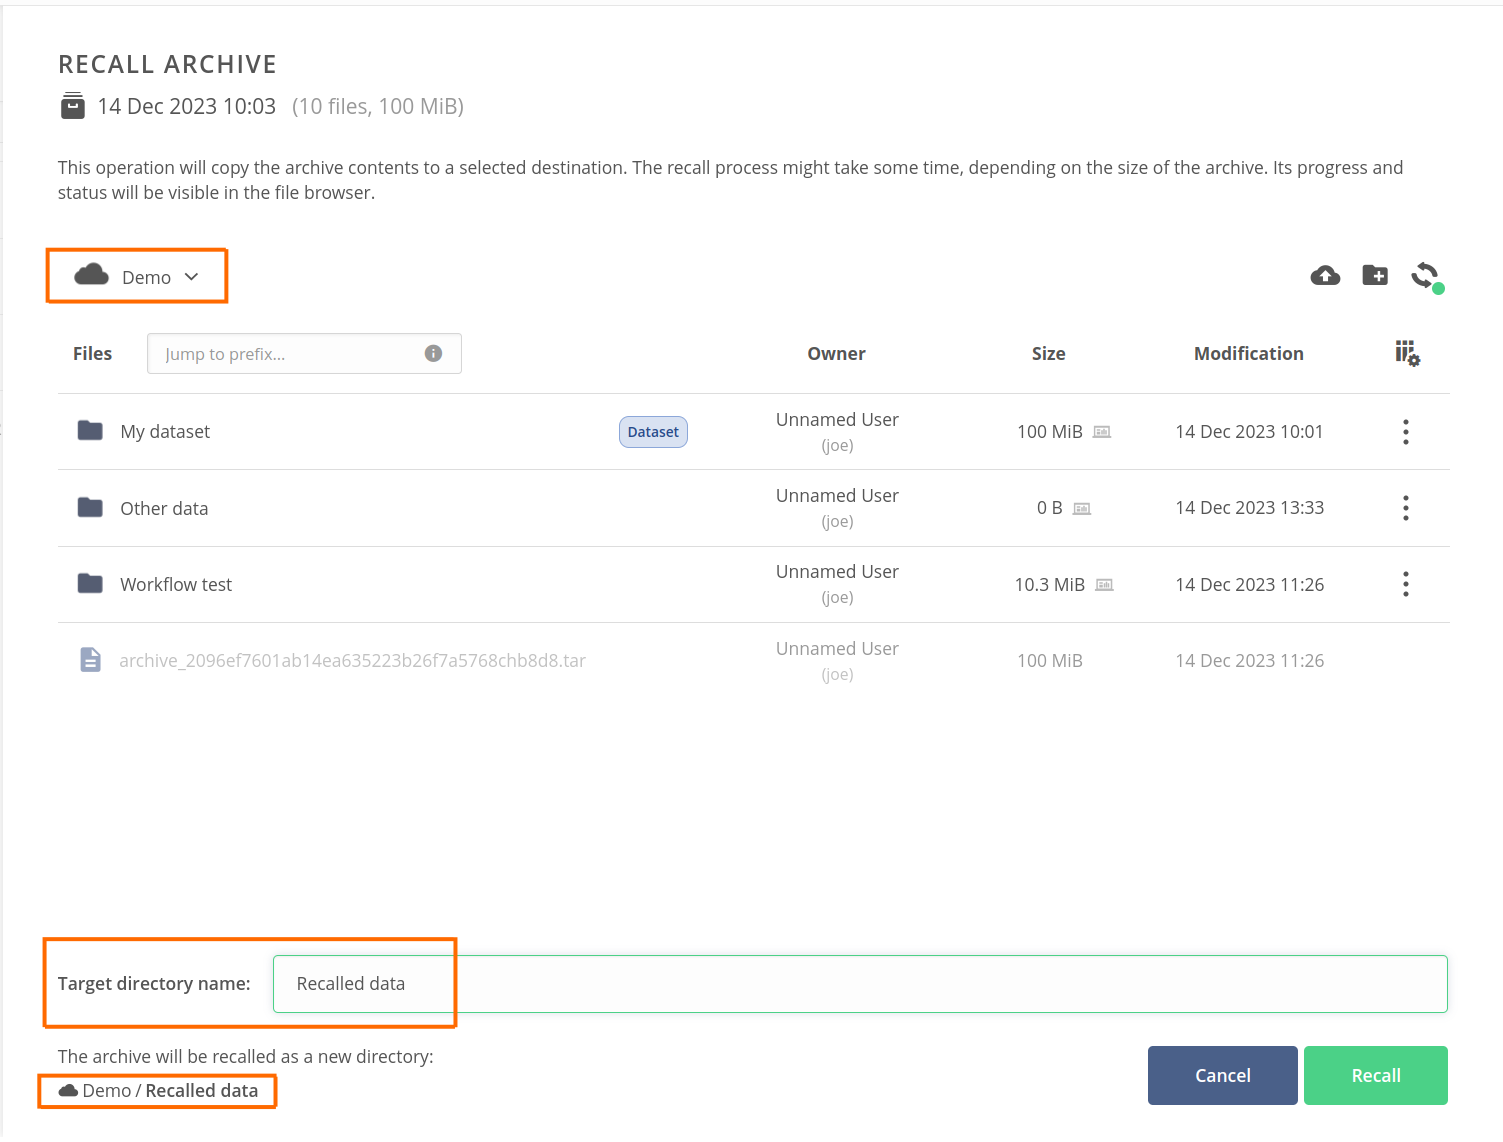
- Click on the Recall button in the bottom-right corner of the panel.
Close the remaining Datasets panel and navigate to the recall target directory. Depending on the current recall status you can see the following badge on the file/directory row:
- if the recall process is still in progress — a green Recalling badge showing the
recall progress,

- if the recall has been completed successfully — a blue Recalled badge,

- if the recall has been completed with some errors — a red Recall failed badge.

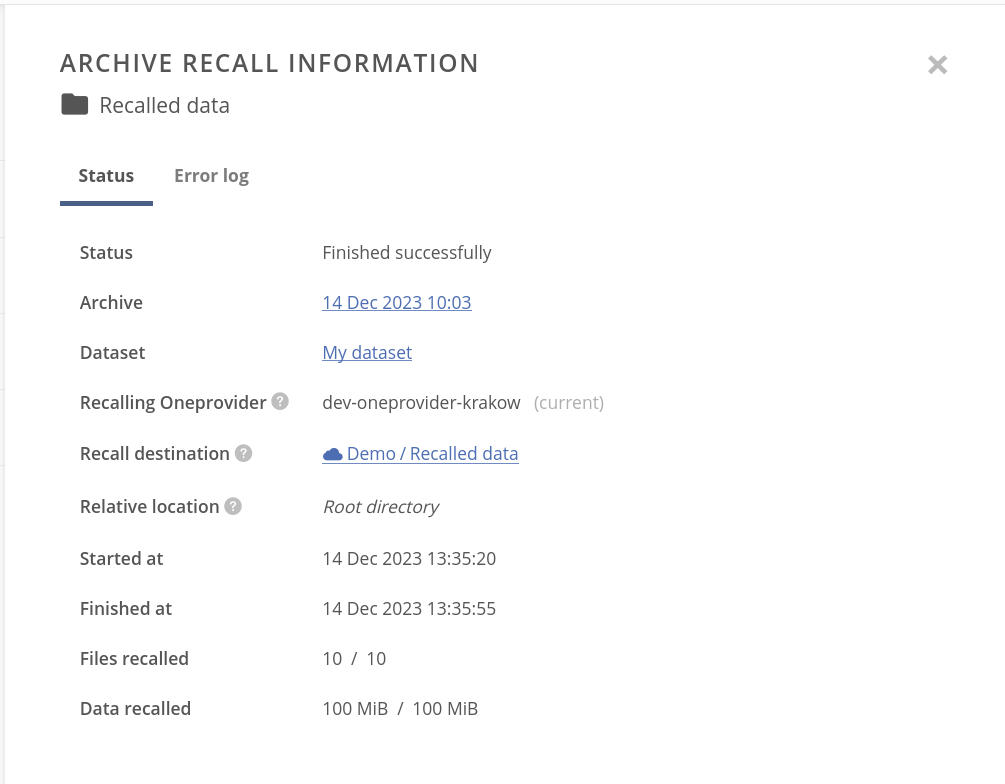
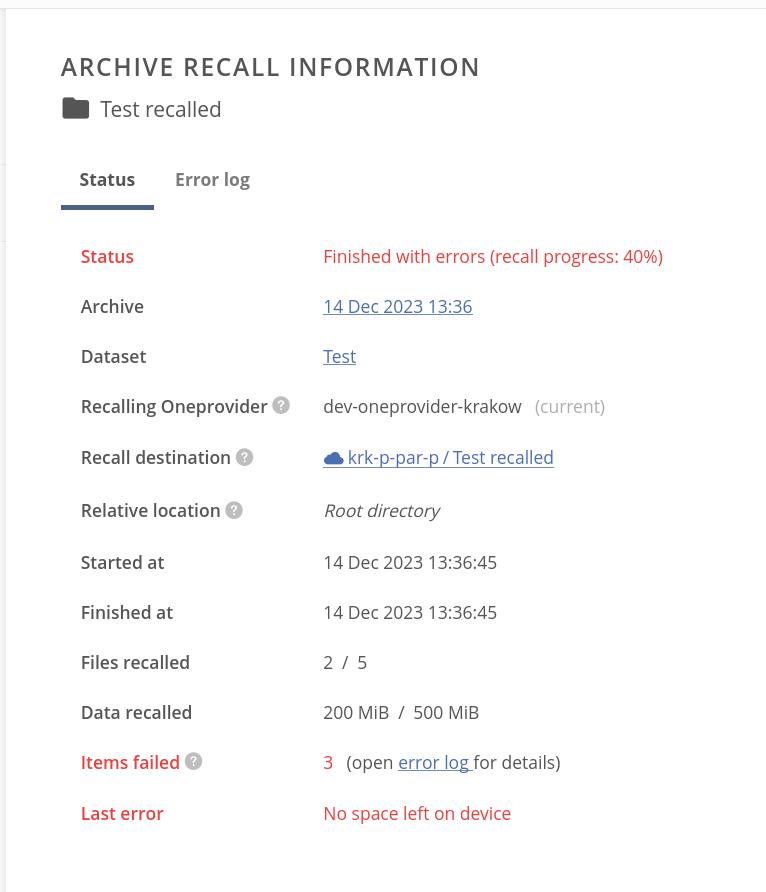
Regardless the recall is in progress or is completed, you can click on the badge to open the Archive recall information panel. It contains various information about the working or completed recall process, such as source archive and dataset, start and finish times, or amount of recalled data.
If the recall failed, the Archive recall information panel contains information about files that have failed to be recalled.
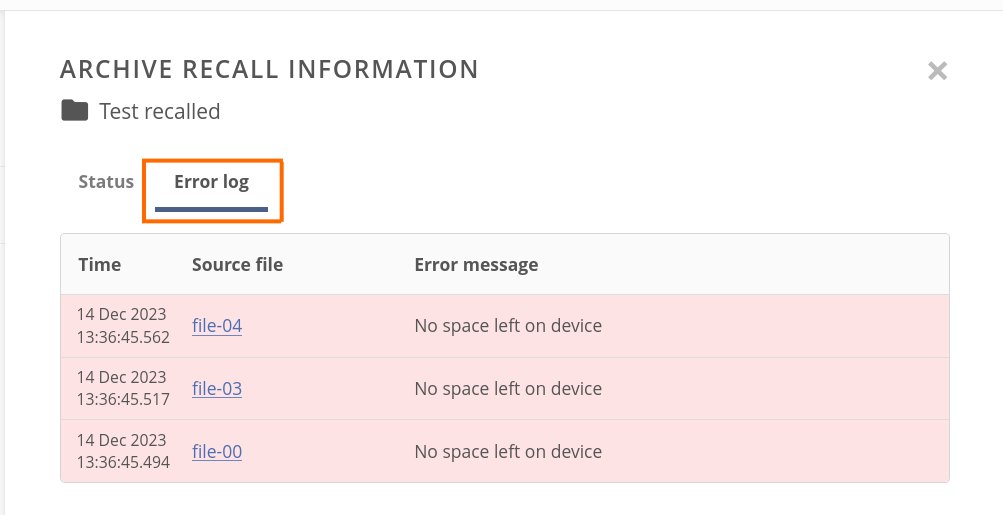
In the Error log tab of the panel, you can browse information about the particular file recall error: time of occurrence, link to the file in the source archive, and the error reason.
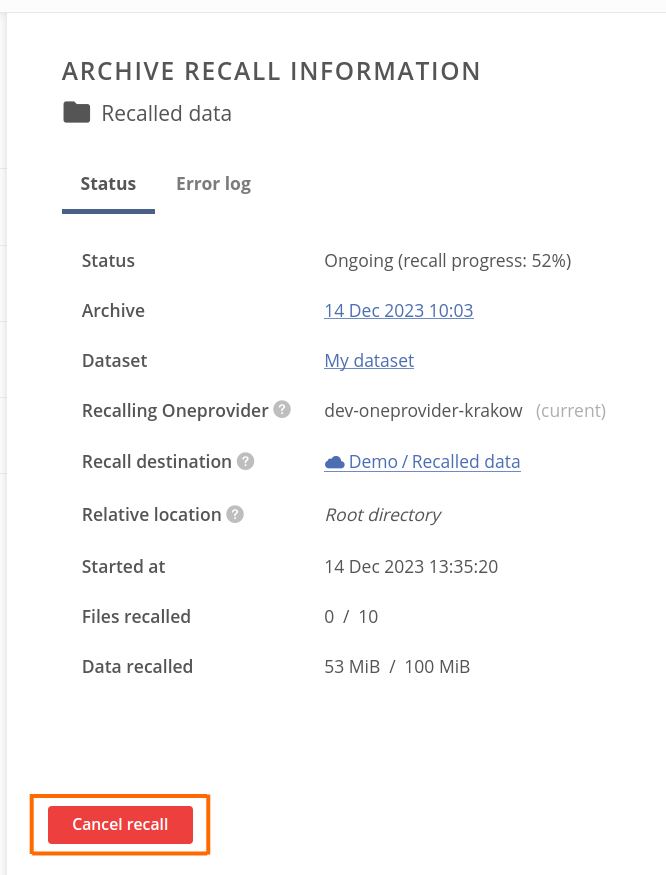
# Cancelling archive recall
While the recall is in progress, you can cancel the process using the Cancel recall button in the bottom-left corner of the Archive recall information panel:
and confirming it in the Cancel recall modal.
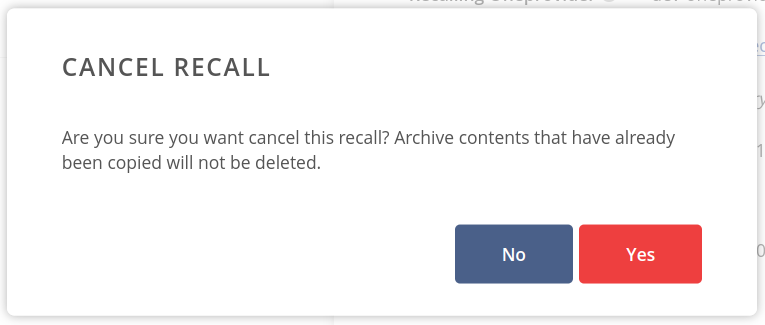
Note, that you should clean up the partially recalled data by yourself.
# Deleting archives
Go to the Archives tab in the Datasets panel of the selected file or directory.
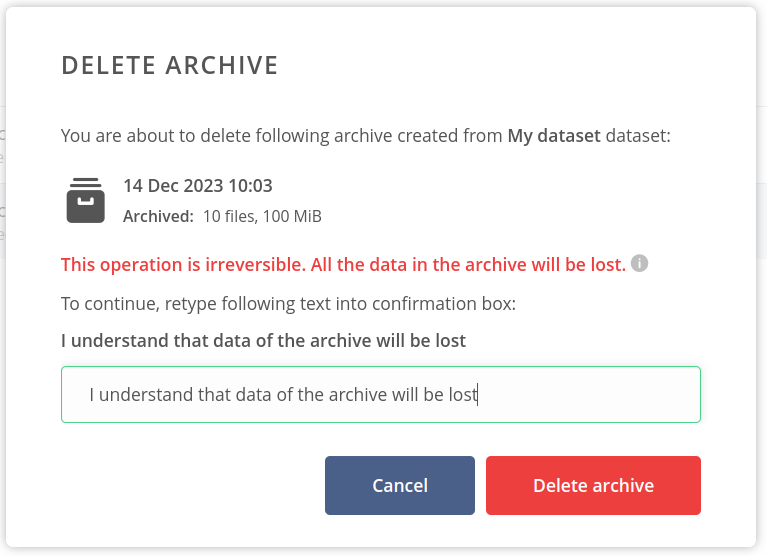
Open the context menu for an archive you wish to delete and choose Delete archive.
To delete the archive, you need to retype the text info displayed in the modal and click on the Delete archive button.
After successful deletion, the archive will disappear from the list.
NOTE
Archives can be deleted as long as their deletion will not cause loss of the data of another archive. That means while deleting the monolithic or base archives is allowed, you cannot delete the nested archives until it is not a top-most ancestor of the hierarchy.