# Oneclient (FUSE native mount)
The Oneclient application allows mounting your Onedata Spaces in a Linux filesystem, so that the data can be accessed as if it resided in the local filesystem. Oneclient is based on the Fuse (opens new window) (Filesystem in Userspace) library and proves useful in many scenarios, for example:
- convenient access using a personal laptop from any place with Internet connection,
- high-performance access in computing environments — the filesystem can be mounted on a worker node and processed interactively or using jobs,
- accessing the data via the command-line interface (terminal),
- accessing and processing the data using specialized software.

# Installation
Oneclient is supported on several major Linux platforms including Ubuntu (Xenial, Bionic, Focal, Jammy) and CentOS 7. It can be installed using packages or using Anaconda (opens new window) package manager.
# Packages
To install Oneclient using packages, simply use the following command:
$ curl -sS http://get.onedata.org/oneclient.sh | bash
NOTE
The above command is only valid when installing the latest release.
For other versions, use appropriate script suffix, e.g. http://get.onedata.org/oneclient-2002.sh.
After installing, ensure that you can access fusermount tool, by
running fusermount -h. This is necessary to later unmount oneclient.
In case you are not allowed to execute fusermount,
ask your administrator to make you a member of the fuse group. If you have
administrator rights to your machine, use the command gpasswd -a <username> fuse
to add your account to the fuse group.
# Anaconda
Oneclient can be also installed using Anaconda (opens new window), from the official Onedata conda repository (opens new window):
NOTE
Currently for release 21.02.*, only Python 3 version 3.9 is supported.
$ conda install -c onedata -c conda-forge python=3.9 oneclient
or to install a specific version of Oneclient:
$ conda install -c onedata -c conda-forge python=3.9 oneclient=21.02.8
# Authentication
To mount your spaces using Oneclient, you need to authenticate with a specific Onezone service and obtain an access token suitable for Oneclient. Access tokens can be generated directly from the Web interface — see the tokens quickstart guide. More information on different types of tokens, and how to create them programmatically using the REST API can be found here.
IMPORTANT
Make sure not to publish your access tokens or share them with anyone. Access tokens should be treated the same way as private keys or passwords — they are intended to be used only by their owners for authentication with Onedata services. The only exception is when a token is consciously limited by caveats that restrict access to data (e.g. read-only access to a specific subdirectory). If you wish to collaborate on the same space and data with another user, simply invite them to your space.
If you are connecting to a Oneprovider service that does not have a globally
trusted certificate, you will have to use -i or --insecure on every
oneclient invocation or export ONECLIENT_INSECURE=1 environment variable.
# Basic usage
The basic command line syntax to mount your spaces with Oneclient is:
$ oneclient -H <PROVIDER_HOSTNAME> -t <ACCESS_TOKEN> <MOUNT_POINT>
or
$ export ONECLIENT_ACCESS_TOKEN=<CLIENT_TOKEN>         # e.g. MDAxNWxvY2F00aW9uIG9uZXp...
$ export ONECLIENT_PROVIDER_HOST=<PROVIDER_HOSTNAME>   # e.g. provider-krakow.onedata.org
$ oneclient <MOUNT_POINT>                              # e.g. /home/joe/oneclient
Provide the hostname of a chosen Oneprovider — one that supports at least one of your spaces. The choice of Oneprovider may depend on several factors:
- The quality of your network connection to the Oneprovider.
- Whether the Oneprovider supports the space that is to be accessed.
- Whether you wish to use the direct I/O mode.
The hostname can be found in the Web GUI.
To terminate the Oneclient application and unmount your spaces, type:
$ fusermount -uz <MOUNT_POINT>
or (depending on version and platform):
$ fusermount3 -uz <MOUNT_POINT>
# Options
# Mounting only selected spaces
By default, oneclient will expose under the specified mountpoint all spaces
available to the user, whose access token was passed on the command line.
It is however possible to limit the visible spaces, by providing a white list of the spaces on the command line. This can be achieved using 2 options:
--space <name>— every occurrence of this option followed by the name of a space will limit the mounted spaces to the specified spaces (e.g.--space Space1 --space Space2)--space-id <id>— every occurrence of this option followed by the id of space will limit the mounted spaces to the specified spaces (e.g.--space-id a58a461875b59988bd16eca960d8130b --space-id bd16eca960d8130ba58a461875b53451)
# Direct I/O and Proxy I/O modes
With respect to data access, oneclient can work in 2 modes: direct I/O and
proxy I/O. The difference between these modes is that direct I/O allows
oneclient to read and write data directly to the physical storage, assuming
that the oneclient process has direct network access to the storage (e.g. S3
bucket or Ceph pool), which is not always available. Proxy I/O mode does not
require physical access to the storage by the Oneclient process, since in this
mode all read and write operations go to the storage indirectly through
Oneprovider. In both modes, filesystem metadata operations (e.g. rename or
truncate) go through Oneprovider to ensure data integrity.
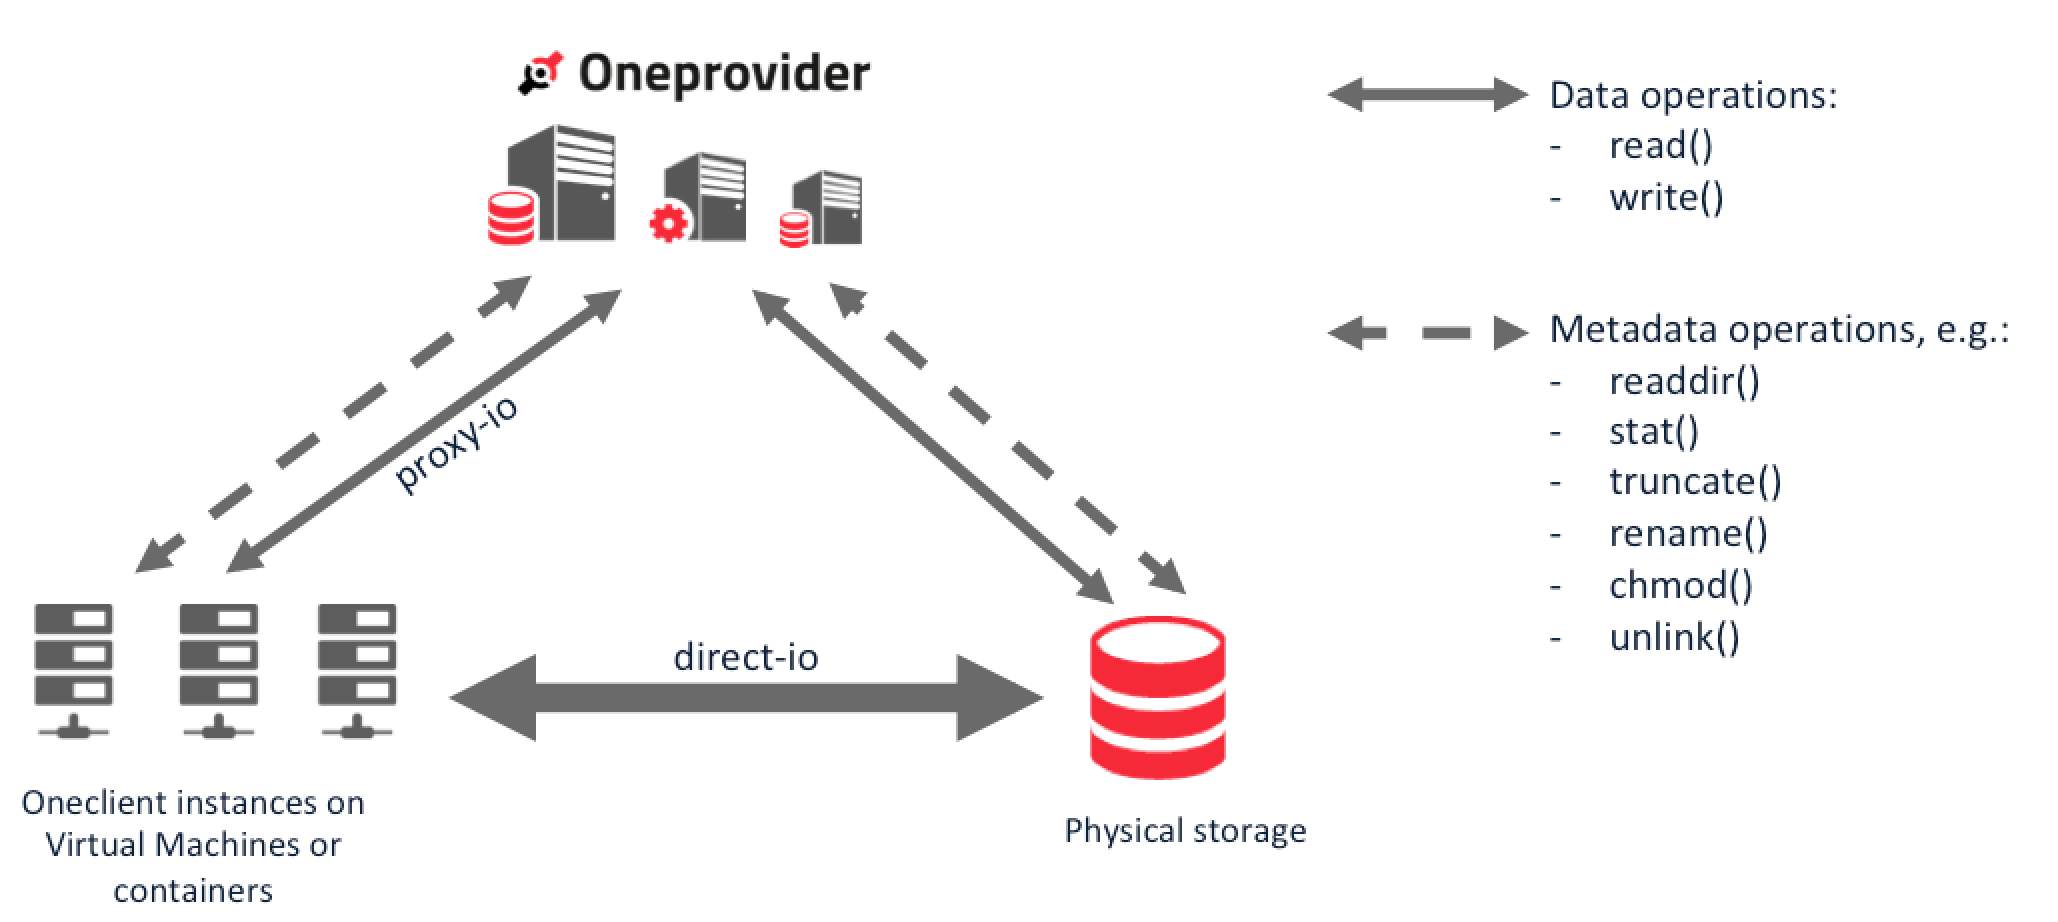
By default, oneclient will automatically try to detect if it can access
storage supporting user spaces directly. The storage access detection is
performed on the first read or write operation in a given space, which may
cause a brief increase in latency.
NOTE
Direct I/O mode should always be preferred if possible due to much
better performance and scalability, as all read and write operations go
directly to the storage and not via the Oneprovider service.
This feature can be controlled using 2 command line options:
--force-proxy-io— disables Direct I/O mode, all data transfers will go via Oneprovider service using so-called Proxy I/O, which in most cases will be somewhat slower, and definitely less scalable than Direct I/O when running a large number of Oneclient instances connected to a single Oneprovider service--force-direct-io— forces Direct I/O mode, anyreadorwriteoperation will returnOperation not supportederror. The only exception is when the file is not accessible due to incorrect permissions on the storage, in such case the file will be accessed using proxy I/O mode.
NOTE
Oneclient will be able to use direct I/O to a storage only if connected to a Oneprovider that supports the space with this storage. In case the data is located on storage managed by another Oneprovider deployment, the data will not be accessible through this Oneclient.
# Buffering
oneclient employs an in-memory buffer for input and output data blocks, which can
significantly improve performance for various types of storage backends, in particular
object based ones such as S3.
If for some reason this in-memory buffer is undesired, it can be disabled using
--no-buffer option.
The buffer size can be also fine-tuned using the following options:
--read-buffer-min-size— the minimum size of the read buffer for a single opened file,--read-buffer-max-size— the maximum size of the read buffer for a single opened file,--read-buffer-total-size— the maximum size of the read buffer for all opened files, if this value is exceeded consecutive open files will be unbuffered,--write-buffer-min-size— the minimum size of the write buffer for a single opened file,--write-buffer-max-size— the maximum size of the write buffer for a single opened file,--write-buffer-total-size— the maximum size of the write buffer for all opened files, if this value is exceeded consecutive open files will be unbuffered,
# Overriding storage helper parameters
Oneclient allows overriding certain storage helper parameters in order to customize direct access to storage from a Oneclient host to the storage. Use cases for this feature include specifying custom mount-point for POSIX storage backends, alternate IP addresses for network storage backends (e.g. available over local network from Oneclient host), etc.
For example, to tell Oneclient that an NFS storage is mounted at
/home/user1/nfs on the Oneclient host the following option should be added to
the Oneclient command line:
--override 2bede2623303bc2a19696e5817e13c0b:mountPoint:/home/user/nfs, where
2bede2623303bc2a19696e5817e13c0b is the storage id of this storage.
The --override option takes 3 arguments separated by ::
storage ID— Onedata internal storage ID, which can be obtained from the Onepanel administrator interface or using REST APIparameter name— the name of the storage helper parameter, these are specific to each type of storageparameter value— a value, which should override the value specified in the Oneprovider storage settings
# Logging
To enable a verbose log, oneclient provides a -v flag, which takes
a single integer argument that determines the logging verbosity:
-v 0— (default) only serious errors-v 1— information, warnings, and errors that are not fatal-v 2— verbose information on requests and their handling-v 3— trace function calls along with their arguments-v 4— binary messages between Oneclient and Oneprovider
NOTE
Above level 2, the size of the logs can be substantial thus it is necessary to monitor free disk space. When the machine runs out of disk space, Oneclient will stop logging.
By default, the logs are buffered and if oneclient process is terminated
abruptly, the latest log messages may not be available. This can be changed
by adding an option --disable-log-buffering, which ensures that every single
log is flushed to the file. This has however significant performance impact.
# Other options
To see the full set of oneclient command line options print help
information on the command line using oneclient -h:
$ oneclient -h
Usage: oneclient [options] mountpoint
A Onedata command line client.
General options:
-h [ --help ] Show this help and exit.
-V [ --version ] Show current Oneclient version and
exit.
-u [ --unmount ] Unmount Oneclient and exit.
-c [ --config ] <path> (=/etc/oneclient.conf)
Specify path to config file.
--ignore-env Ignore options from environment
variables.
-H [ --host ] <host> Specify the hostname of the Oneprovider
instance to which the Oneclient should
connect.
-P [ --port ] <port> (=443) Specify the port to which the Oneclient
should connect on the Oneprovider.
-i [ --insecure ] Disable verification of server
certificate, allows to connect to
servers without valid certificate.
-t [ --token ] <token> Specify Onedata access token for
authentication and authorization.
--space <name> Allows to specify which space should be
mounted, where the value of the
argument is space name. Specify
multiple times for multiple spaces. If
not specified, all users spaces will be
mounted.
--space-id <id> Allows to specify which space should be
mounted, where the value of the
argument is space id. Specify multiple
times for multiple spaces. If not
specified, all users spaces will be
mounted.
-l [ --log-dir ] <path> (=/tmp/oneclient/0)
Specify custom path for Oneclient logs.
--custom-ca-dir <path> Path to directory with custom CA
certificates in PEM format.
-v [ --verbose-log-level ] <level> (=0)
Specify the verbosity level (0-3) for
verbose logs (only available in debug
builds).
--disable-log-buffering Disable log buffering.
Advanced options:
--io-trace-log Enable detailed IO trace log
(experimental).
--log-read-write-perf Enable read write performance logger.
--force-proxy-io Force proxied access to storage via
Oneprovider for all spaces.
--force-direct-io Force direct access to storage for all
spaces.
--buffer-scheduler-thread-count <threads> (=1)
Specify number of parallel buffer
scheduler threads.
--communicator-pool-size <connections> (=25)
Specify number of connections in
communicator pool.
--scheduler-thread-count <threads> (=1)
Specify number of parallel scheduler
threads.
--storage-helper-thread-count <threads> (=10)
Specify number of parallel storage
helper threads.
--no-buffer Disable in-memory cache for
input/output data blocks.
--no-xattr Disable extended attributes support.
--provider-timeout <duration> (=120) Specify Oneprovider connection timeout
in seconds.
--storage-timeout <duration> (=120) Specify I/O storage timeout in seconds.
--disable-read-events Disable reporting of file read events.
--no-fullblock-read Disable fullblock read mode. With this
option read can return less data than
requested in case it is immediately
available and consecutive blocks need
to be prefetched from remote storage.
--read-buffer-min-size <size> (=4096) Specify minimum size in bytes of
in-memory cache for input data blocks.
--read-buffer-max-size <size> (=104857600)
Specify maximum size in bytes of
in-memory cache for input data blocks.
--read-buffer-prefetch-duration <duration> (=1)
Specify read ahead period in seconds of
in-memory cache for input data blocks.
--write-buffer-min-size <size> (=20971520)
Specify minimum size in bytes of
in-memory cache for output data blocks.
--write-buffer-max-size <size> (=52428800)
Specify maximum size in bytes of
in-memory cache for output data blocks
of a single opened file handle.
--read-buffers-total-size <size> (=2097152000)
Specify total maximum size in bytes of
in-memory cache for input data blocks
of all opened file handles. When 0,
read buffers are unlimited.
--write-buffers-total-size <size> (=1048576000)
Specify total maximum size in bytes of
in-memory cache for output data blocks
of all opened file handles. When 0,
write buffers are unlimited.
--write-buffer-flush-delay <delay> (=5)
Specify idle period in seconds before
flush of in-memory cache for output
data blocks.
--min-block-prefetch-size <bytes> (=1048576)
Specify the minimum prefetch block
size.
--seqrd-prefetch-threshold <fraction> (=1.000000)
Specify the fraction of the file, which
will trigger replication prefetch after
that part of the file is already
replicated (experimental).
--rndrd-prefetch-threshold <fraction> (=1.000000)
Specify the fraction of the file, which
will trigger replication prefetch after
that part of the file is already
replicated in random blocks across
entire file (experimental).
--rndrd-prefetch-eval-frequency <count> (=50)
Number of reads from single file handle
which will be skipped before next
evaluation of cluster prefetch. 0 means
that prefetch evaluation will be
performed on each read. (experimental).
--rndrd-prefetch-block-threshold <count> (=0)
Number of separate blocks after which
replication for the file is triggered
automatically. 0 disables this feature
(experimental).
--rndrd-prefetch-cluster-window <size> (=20971520)
Cluster window size for prefetching in
[bytes]. When -1 is provided, the
entire file is considered for
prefetching (experimental).
--rndrd-prefetch-cluster-block-threshold <count> (=5)
Number of separate blocks in a cluster
window around current read, after which
replication of a cluster block (window)
is triggered (experimental).
--rndrd-prefetch-cluster-window-grow-factor <fraction> (=0.000000)
Prefetch cluster window grow factor,
which enables the prefetch window to
grow proportionally to current
replication progress -
initial_window_size*[1+grow_factor*file
_size*replication_progress/initial_wind
ow_size)] (experimental).
--prefetch-mode arg (=async) Defines the type of block prefetch
mode. Possible values are: async, sync.
Default is: async (experimental).
--cluster-prefetch-threshold-random Enables random cluster prefetch
threshold selection (experimental).
--metadata-cache-size <size> (=5000000)
Maximum number of file attributes
cached in the metadata cache.
--readdir-prefetch-size <size> (=2500)
Specify the size of requests made
during readdir prefetch (in number of
dir entries).
--dir-cache-drop-after <seconds> Specify (in seconds) how long should
directories be cached since last
activity. When 0 is provided, the cache
never expires.
--tag-on-create <name>:<value> Adds <name>=<value> extended attribute
to each locally created file.
--tag-on-modify <name>:<value> Adds <name>=<value> extended attribute
to each locally modified file.
-r [ --override ] <storageId>:<name>:<value>
Allows to override selected helper
parameters for specific storage, e.g.
'd40f2f63433da7c845886f6fe970048b:mount
Point:/mnt/nfs'
--emulate-available-space <bytes> (=0)
When set to non-zero value, emulates
available space reported by stat system
call to specified number of bytes.
--hard-link-count Show hard link count properly in stat.
--enable-archivematica Enable Archivematica mode.
--public-data-mode Enable Public Data mode, in which space
directories list Public Data
collections (shares with assigned
PID/DOI identifiers) instead of regular
files.
--show-space-ids Show space Id's instead of space names
in the filesystem tree.
FUSE options:
-f [ --foreground ] Foreground operation.
-d [ --debug ] Enable debug mode (implies -f).
-s [ --single-thread ] Single-threaded operation.
-o [ --opt ] <mount_option> Pass mount arguments directly to FUSE.
Monitoring options:
--monitoring-type <reporter> Enables performance metrics monitoring -
allowed values are: graphite.
--monitoring-level-basic Sets monitoring reporting level to basic
- default.
--monitoring-level-full Sets monitoring reporting level to full.
--monitoring-period <seconds> (=30) Performance metrics reporting period.
--graphite-url <url> Graphite url - required when
monitoring-type is 'graphite', the scheme
can be either tcp or udp and default port
is 2003
--graphite-namespace-prefix <name> Graphite namespace prefix.
# File extended attributes
Extended file attributes are used in Oneclient to expose file metadata.
They can be accessed with tools such as xattr (opens new window)
or getfattr. Extended attributes, starting with org.onedata. prefix, are
Onedata system attributes that provide useful information about files.
For more information on metadata management in Oneclient please look
here.
# Using Oneclient from Docker
Oneclient can also be started without installation using our official Docker images:
$ docker run --privileged -e ONECLIENT_ACCESS_TOKEN=<ACCESS_TOKEN> \
-e ONECLIENT_PROVIDER_HOST=<PROVIDER_HOSTNAME> \
-d --name oneclient-1 onedata/oneclient:21.02.8
This will start a Docker container with mounted spaces in /mnt/oneclient
directory (inside the container). They can be accessed from another terminal,
for instance using:
$ docker exec -it oneclient-1 /bin/bash

$ ls /mnt/oneclient
However, if it is necessary to enter the Docker and start the Oneclient manually, the Docker image entry point should be overridden as follows:
$ docker run --privileged --entrypoint=/bin/bash onedata/oneclient:21.02.8
# Running Oneclient as systemd service
In some scenarios, it may be convenient to run Oneclient as a service that is
mounted before certain other services (e.g. user jobs) are executed on the
machine. For this purpose, a simple systemd service script can be created,
with an accompanying environment file with proper definitions.
The environment file should be created at: /etc/oneclient.env
ONECLIENT_PROVIDER_HOST=<ONEPROVIDER_HOST>
ONECLIENT_ACCESS_TOKEN=<ACCESS_TOKEN>
ONECLIENT_MOUNT=/mnt/oneclient
After that the systemd service script /etc/systemd/system/oneclient.service
can look like this:
[Unit]
Description = Oneclient service
After       = network.target

[Service]
EnvironmentFile=/etc/oneclient.env
# Create Oneclient mountpoint if necessary
ExecStartPre=/usr/bin/mkdir -p $ONECLIENT_MOUNT
# Start Oneclient
ExecStart=/opt/oneclient/bin/oneclient -i -o allow_other $ONECLIENT_MOUNT
# Unmount oneclient when stopping the service
ExecStop      = /bin/fusermount -uz $ONECLIENT_MOUNT
# Change to `always` to automatically restart Oneclient
Restart       = no
Type          = forking

[Install]
WantedBy    = multi-user.target
The oneclient service can then be used in the following way:
# Start oneclient
$ sudo systemctl start oneclient

# Start oneclient on machine startup
$ sudo systemctl enable oneclient

# Unmount oneclient
$ sudo systemctl stop oneclient

# Check oneclient status
$ sudo systemctl status oneclient
# Docker Volume Plugin
# Overview
Docker volume plugins (opens new window) allow creation of Docker volumes independently of any containers, enabling automatic connection between containers and custom storage systems, without the necessity of installing any third party software inside the containers.
Onedata volume plugin allows to create volumes for your spaces. Each volume represents a specific Oneclient set of settings in terms of Oneprovider host and access token, i.e. multiple users can have different volumes on the same host machine.
Using Onedata Docker volume plugins enables users to access Onedata spaces from their containers without having to manually start Oneclient neither on the host or within the container.
# Installation
The Onedata Docker volume plugin can be installed using packages which are provided for Ubuntu and CentOS.
The easiest way is to use the oneclient.sh automated installation script:
$ wget -qO- http://packages.onedata.org/oneclient.sh
$ sh oneclient.sh docker-volume-onedata
The script should automatically install the plugin and oneclient CLI. This can be verified using:
$ oneclient -V
Oneclient: 21.02.8
FUSE library: 2.9
Onedata Docker volume plugin is installed as a systemd service, and can be
managed using systemctl command. After installation is complete it should
be enabled and started as follows:
$ sudo systemctl enable docker-volume-onedata.service
$ sudo systemctl start docker-volume-onedata.service
In order to check that the service is running properly, the following command can be used and the expected output should look similar to this example:
$ sudo systemctl status docker-volume-onedata.service

● docker-volume-onedata.service - Onedata Docker volume plugin
   Loaded: loaded (/usr/lib/systemd/system/docker-volume-onedata.service; disabled; vendor preset: enabled)
   Active: active (running) since Wed 2017-08-02 11:08:59 CEST; 1h 56min ago
 Main PID: 5481 (docker-volume-o)
    Tasks: 3
   Memory: 1.2M
      CPU: 182ms
   CGroup: /system.slice/docker-volume-onedata.service
           └─5481 /usr/bin/docker-volume-onedata /var/lib/docker/plugins

Aug 02 22:08:59 ubuntu systemd[1]: Started Onedata Docker volume plugin.
Aug 02 22:08:59 ubuntu docker-volume-onedata[5481]: Plugins root: /var/lib/docker/plugins
Aug 02 22:08:59 ubuntu docker-volume-onedata[5481]: time="2017-08-02T11:08:59+02:00" level=info msg="Listening on Unix socket: /run/docker/plugins/onedata.so
# Usage
Once the Onedata Docker volume plugin service is running, all users in the
docker group can create their volumes.
# Creating volumes
A basic command to create a volume named my_volume, which mounts user spaces
from a specific Oneprovider and with a specific access token is as follows:
$ docker volume create --driver onedata \
        -o host=$PROVIDER_DOMAIN \
        -o token=$ACCESS_TOKEN \
        my_volume
When connecting to a Oneprovider instance without a trusted certificate,
-o insecure=true option must be added. Additionally, Onedata Docker volume
plugins supports all regular Oneclient command line options,
which must be added with -o followed by option name, equal sign and value
(e.g. -o force-direct-io=true -o read-buffer-max-size=52428800):
After the volume is created successfully, its settings can be checked using:
$ docker volume inspect my_volume

[
    {
        "Driver": "onedata",
        "Labels": {},
        "Mountpoint": "/var/lib/docker/plugins/volumes/6a539918ac2c5baf8c0dbf324fe3826f",
        "Name": "my_volume",
        "Options": {
            "host": "oneprovider.example.com",
            "insecure": "true",
            "token": "MDAxNWxvY2F00aW9uIG9uZXpvbmUKMDAzYmlkZW500aWZpZXIgRHR00WTg5dHNHOFZxSzVBZkJhamtaa004wMU5ocWc00azI3WkV00Z00ZkdDJSawowMDFhY2lkIHRpbWUgPCAxNTE5NDgyNDc4CjAwMmZzaWduYXR1cmUgt01Zu6WZ2Wqt3s02nUItRAVDBMYWx6BlBTNQ5KBNqQSDI1"
        },
        "Scope": "local"
    }
]
Creating a volume does not automatically invoke Oneclient and does cause connection to Oneprovider in anyway. Only when a container is started with this volume attached, the Oneclient is mounted. If multiple containers have the same volume attached, the Oneclient is automatically unmounted after the last container is stopped.
To remove a volume, run:
$ docker volume rm my_volume
This command will not remove any data, it will simply remove the volume entry from local Docker configuration on the host.
# Using volumes in containers
In order to attach a volume to container, start any Docker image and mount the Onedata volume to some directory within the container, e.g.:
$ docker run -v my_volume:/spaces -it alpine ls /spaces

MySpace1
MySpace2
Please note that the Docker image doesn't require any Onedata specific packages installed.
# Security
Docker volume plugins do have a serious security limitation, which allows any
user in the docker group to access any volumes on the host, regardless of
which user created them. Thus, it is advisable to only use Docker volume
plugins on machines with exclusive access or where only trusted users have
access, as they will be able to access any Onedata volume created on this host.